
Tattoo Needle Sizes: A Practitioner-Focused Guide
You're in the chair, the machine's humming, and the artist says a number like 3RL #10 or 7RL #12 as if it's obvious. If you've ever nodded along while privately wondering what that changes on skin, you're not alone. The useful way to read tattoo needle sizes is simpler than many make it, but it starts with two decisions, not one.
Table of Contents
What Your Artist Means When They Call Out a Needle - One label, two decisions
The Two Numbers Behind Every Tattoo Needle Size - Gauge tells you the pin thickness - Grouping tells you how the pins work together
Comparing the Three Gauges Studios Actually Use - What each gauge tends to do - How artists actually choose
Liners, Shaders, and Magnums Explained - Round liners are for control - Round shaders soften the spread - Magnums cover more ground
Why Smaller Does Not Automatically Mean Safer - Depth is not the same as needle exposure - The better consultation question
Matching Needle Sizes to Tattoo Styles - Style to setup as a working map - Where overlap happens
Machines, Cartridges, Sterility, and Your Consultation Checklist - What to look for in the room - A consultation checklist you can actually use
What Your Artist Means When They Call Out a Needle
The number you hear in the studio usually hides a lot of practical judgment. A cartridge label is shorthand for how thick each pin is and how many pins are grouped together. Those are separate choices, and they do different jobs in the skin.
One label, two decisions
A #12 gauge pin is commonly about 0.35 millimeters, and that's the reference point many artists treat as standard, including the controlled setup described in Scientific Reports research reference. Change the diameter and you change puncture width, ink flow, and how the grouping moves through skin. Keep the diameter the same but change the grouping, and you change coverage, line weight, and saturation pattern.
That's why a 3RL isn't one fixed thing. It means three pins in a round liner configuration, but those pins can still be #10 or #12. A client who hears only “3RL” knows the grouping, but not the actual pin diameter. That's the first trap to avoid.
Practical rule: ask for both the gauge and the grouping. “Small” and “large” don't tell you enough.
The distinction matters most when you're comparing styles. Fine-line work, illustrative work, traditional outlines, and large-scale color all ask for different combinations. If you want a clean consultation, ask the artist which part of the setup changes the line, and which part changes the amount of ink moving through the needle. For a good example of the kinds of questions that lead to a better conversation, this consultation guide is the right kind of mindset.
The Two Numbers Behind Every Tattoo Needle Size
Needle sizing gets clearer once you separate the two axes and stop treating the cartridge label like a single score. The first axis is diameter, also called gauge. The second axis is grouping, the count and arrangement of pins.
Gauge tells you the pin thickness
Here's the simplest useful reference for tattoo needle sizes.
A lower gauge number means a larger diameter. That part trips people up because the numbering feels backward at first. Once you get it, the rest of the sizing language becomes easier to decode.
Grouping tells you how the pins work together
A 3RL has three pins in a round liner grouping. A 7RL has seven pins in the same kind of grouping, so it lays a wider line and moves differently in the skin. The grouping name tells you the geometry, while the gauge tells you the pin thickness. Those are not interchangeable details.
A useful way to read a cartridge is to ask two questions. First, how thick is each pin? Second, how are the pins arranged? A 3RL #10 and a 3RL #12 both have three pins, but the narrower #10 setup gives you a finer puncture profile and different ink behavior than the #12.
Working takeaway: a label only makes sense when you read it as diameter plus grouping. If you only know one, you don't actually know the tool.
Comparing the Three Gauges Studios Actually Use
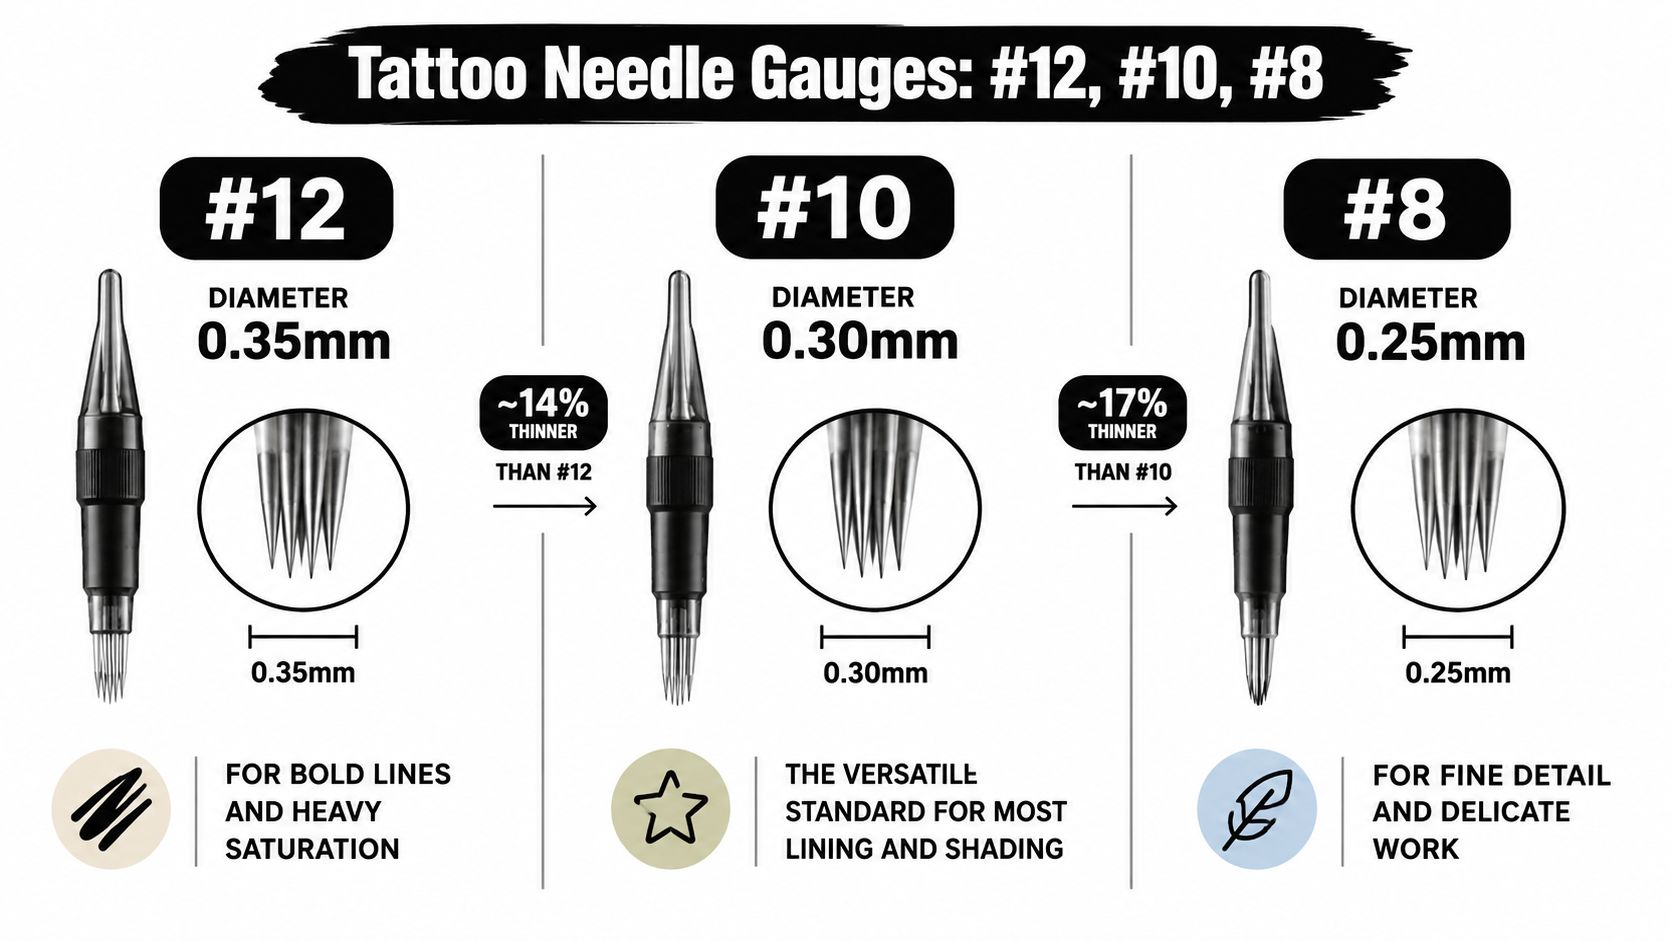
The modern shop usually talks around three diameters, #12, #10, and #8. The differences look small on paper, but they change how a grouping tracks, how much pigment it moves, and how much correction the artist needs while working. That's why you'll hear experienced artists describe a setup as “stiffer,” “softer,” or “more controlled” instead of just “smaller.”
What each gauge tends to do
#12 at 0.35 mm is the versatile workhorse. It's commonly used when an artist wants dependable flow and enough stiffness for bolder lines or solid saturation. #10 at 0.30 mm is narrower, and #8 at 0.25 mm is narrower still, which is why both are often pulled into precision work where the artist wants tighter control over deposition.
The practical differences are real. The #10 diameter is about 14% narrower than #12, and #8 is about 29% narrower than #12 technical review. That doesn't sound dramatic, but in skin it changes the feel of the grouping and the amount of pigment it can deliver.
How artists actually choose
A good artist doesn't choose gauge by ego or trend. They choose it by style, body area, and the amount of ink they need to place with each pass. A thinner needle can help with delicate work, but it can also require more care to build saturation. A thicker needle can move pigment more decisively, but it can feel heavier in the skin if the technique isn't controlled.
If you want to understand the trade-off in plain language, ask about line weight, ink flow, and how many passes the artist expects to need. That's a much more useful conversation than asking whether a needle is “better” in the abstract. For a shop-level overview of kit choices and cartridge systems, this equipment guide is a practical reference.
Liners, Shaders, and Magnums Explained
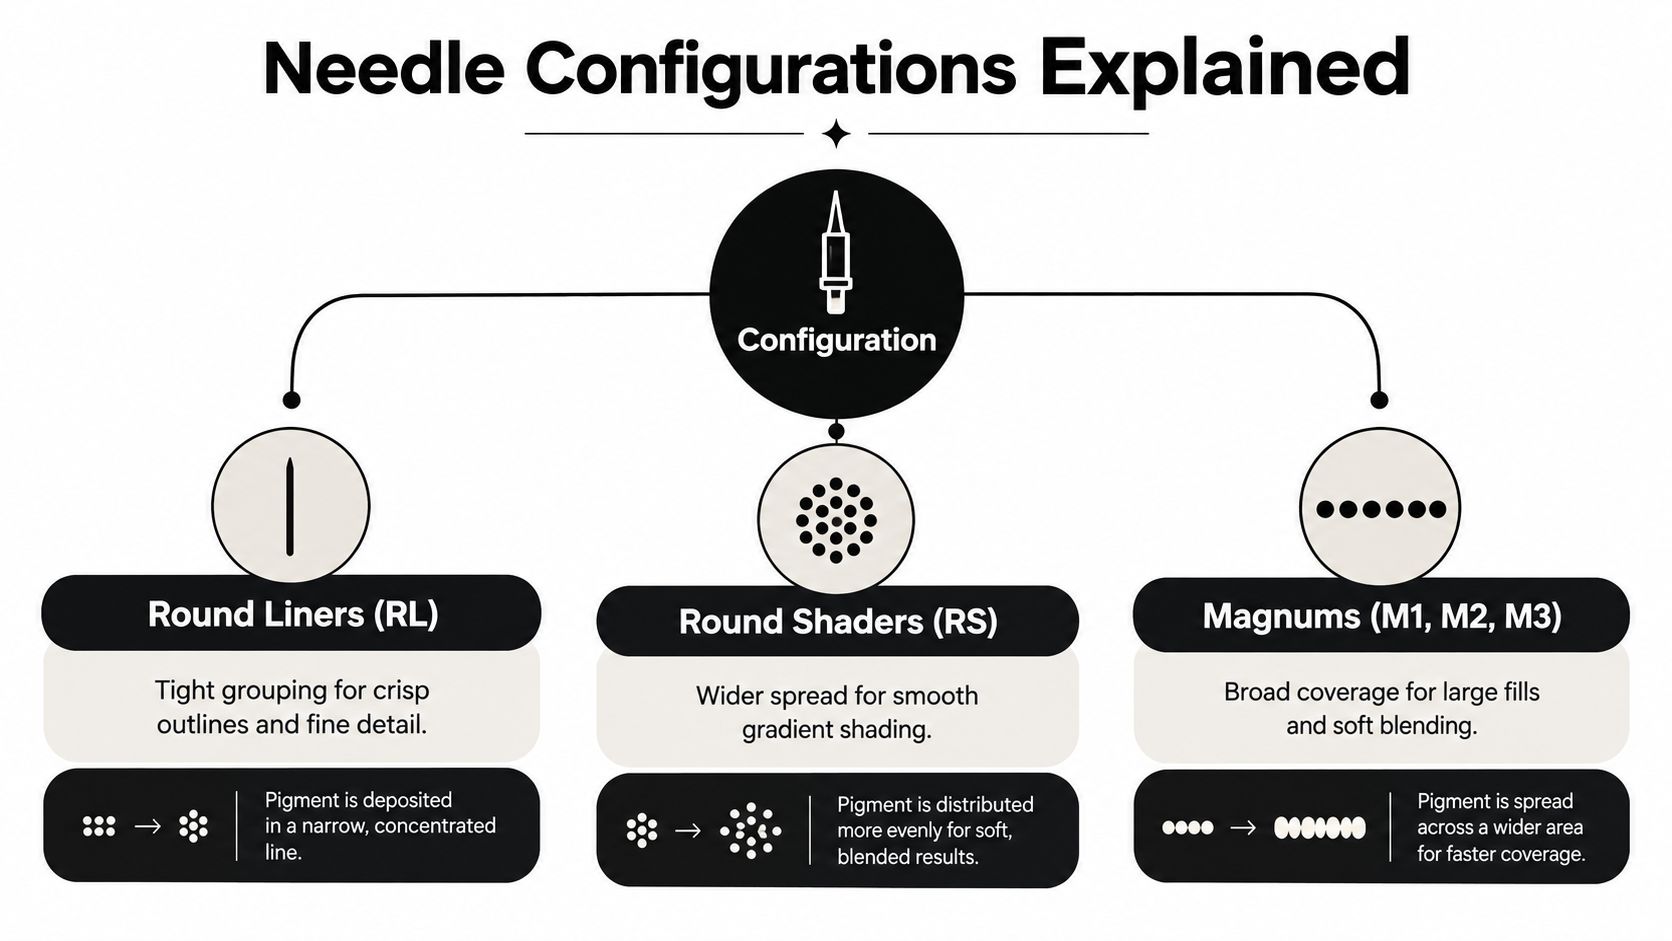
Once the gauge makes sense, configuration becomes the next big lever. Here, the same pin thickness starts behaving like a different tool, because the pins are arranged to concentrate, spread, or fan out pigment in different ways. Two cartridges can carry the same count of pins and still act very differently in skin.
Round liners are for control
Round Liners, or RLs, keep the pins tightly grouped. That concentrated arrangement is why they're suited to crisp outlines, lettering, and small detail. A 7RL is not just a “bigger 7,” it's a tighter line-making tool with more body behind the stroke than a 3RL, but the same basic family behavior.
Round shaders soften the spread
Round Shaders, or RSs, use a looser arrangement. The pins are still in a round shape, but they're spread to give a softer deposit. That makes them useful for smaller shading zones, light transitions, and textures where a hard edge would look wrong.
Magnums cover more ground
Magnums arrange pins in rows, which broadens the skin-contact area and makes them efficient for gradients, color packing, and larger fills. A 7-magnum is not an equivalent to a 7RL. The liner concentrates pigment into a narrow track, while the magnum distributes it across a wider band.
A sleeve or back piece often needs both ends of the spectrum. Artists switch between concentrated RL or RS setups and broader magnums because matching the tool to the job reduces unnecessary passes.
That's the practical benefit for clients. If a gradient is being built with a magnum, or a tiny script line is being pulled with a round liner, the choice usually has more to do with coverage pattern than with needle count alone. Pin count matters, but geometry decides how that count behaves.
Why Smaller Does Not Automatically Mean Safer
This is the misconception clients repeat most often. A smaller tattoo needle size doesn't automatically mean less pain, less trauma, or a better heal. It can help with control, but control is not the same thing as safety by default.
Depth is not the same as needle exposure
One experimental study found that a 1 mm needle exposure produced measured ink deposition of only about 0.32 mm on average experimental study. That's a strong reminder that the amount of needle sticking out of the cartridge doesn't reliably tell you where the ink ends up. Skin thickness, hand speed, machine stroke, and placement all change the result.
So when someone asks, “Will a smaller needle go shallower?” the honest answer is not necessarily. A finer diameter can help with detail and can make a setup feel more controlled, but it doesn't guarantee a gentler tattoo. A slow hand with the wrong needle can still overload tissue, and a fine needle pushed with too many passes can still create rough saturation.
The better consultation question
Ask what the artist is optimizing for. Maybe it's line clarity on a wrist tattoo. Maybe it's smoother shading across a shoulder. Maybe it's avoiding overworking thin skin on the ribs. The right answer depends on the area, the design, and the technique.
If you want a smart follow-up, ask these three things:
Which grouping are you using for the outline? That tells you whether the line is coming from an RL, RS, or magnum setup.
Which gauge are you using, and why? That tells you whether the artist is prioritizing flow, control, or precision.
How are you adjusting for this body area? That tells you whether the setup matches the skin instead of just the stencil.
The right setup is the one that fits the design and the anatomy together. Smaller can be useful, but it's not a shortcut to better outcomes.
Matching Needle Sizes to Tattoo Styles
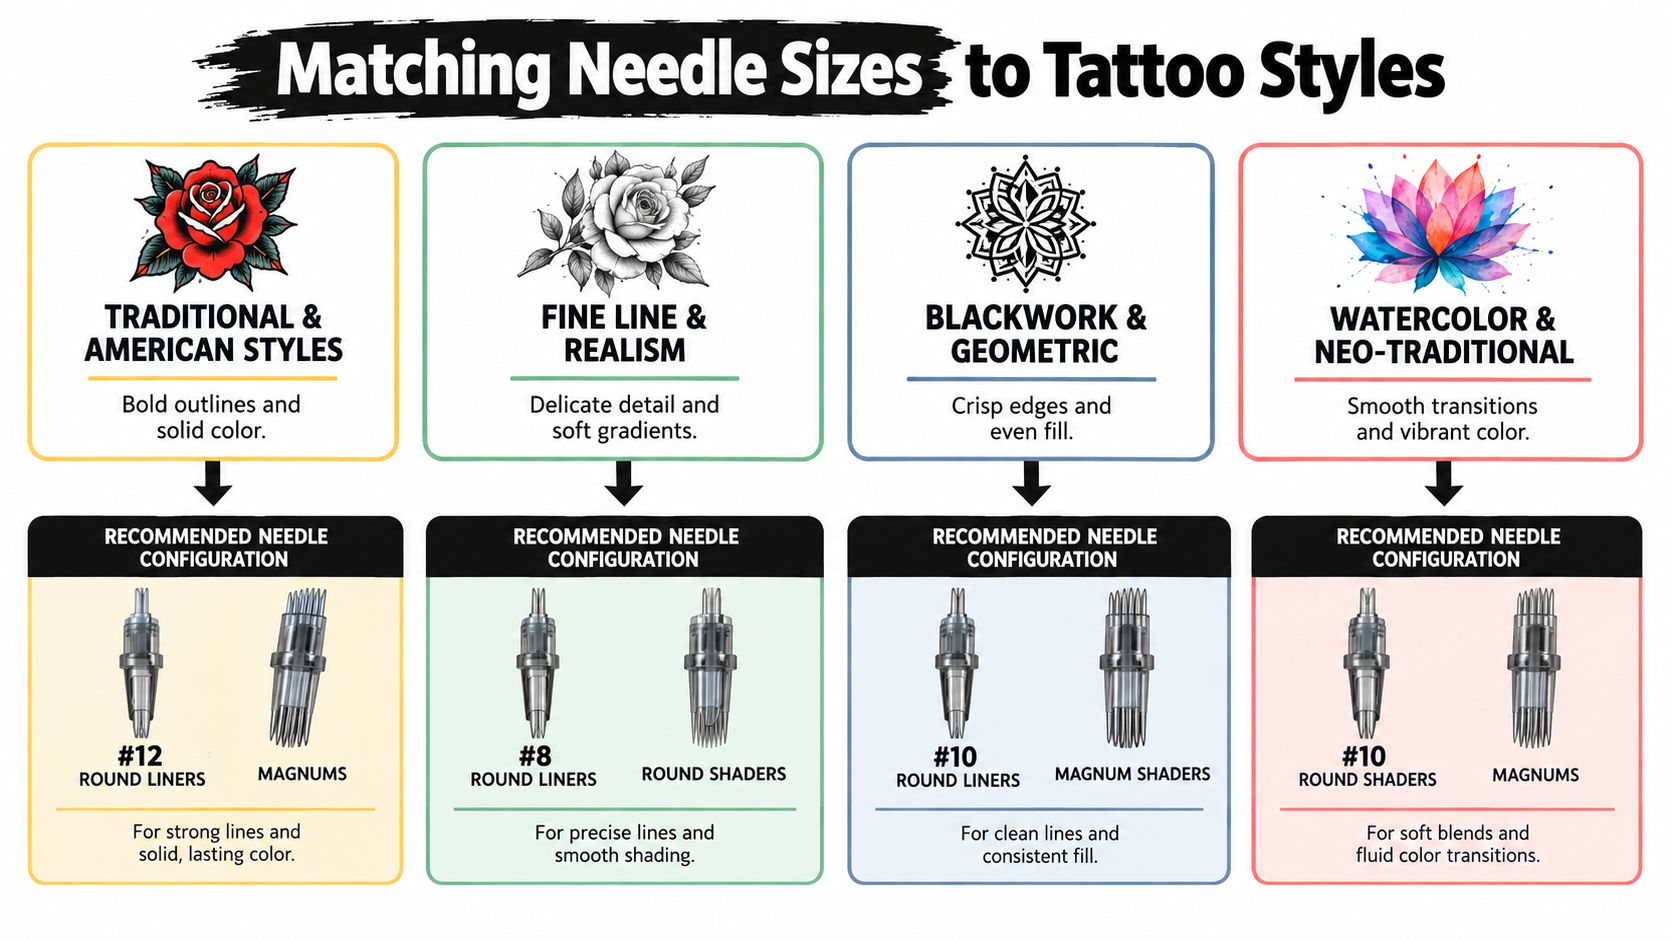
The sizing conversation becomes useful to a first-time client. Style gives you a clue, but it doesn't dictate one perfect cartridge. The same visual result can often be reached with more than one setup, and good artists choose based on line behavior, saturation target, and how much room the skin gives them.
Style to setup as a working map
Fine lines and single-needle portraits often sit in the #10 or #8 range, usually with small round liners or similarly tight configurations. The narrower diameter gives the artist more control when the design depends on delicate marks. Crisp lettering usually benefits from small RL groupings because the line has to stay readable and consistent.
Bold traditional outlines usually call for #12 round liners because the line needs body and repeatability. Smooth black-and-gray gradients often move better with magnums, since the wider contact area helps the artist lay down tone without fighting the skin. Color packing for sleeves or other large work also tends to favor magnums because coverage matters more than microscopic line control.
Where overlap happens
The same visual style can hide different setups. A fine-line illustration and a thin script tattoo might both use a 3RL, but one might be a #10 and the other a #12. The label matters because it tells you how the artist plans to move pigment, not just what the finished tattoo will look like.
The cleanest way to talk about style is to pair the image with the setup. Ask what the line has to do, where the shading has to land, and whether the artist wants a softer or firmer deposit. That gives you a real conversation instead of a vague reassurance. If you're comparing style-specific tools, it also helps to know the setup behind the design language, not just the style name itself.
Machines, Cartridges, Sterility, and Your Consultation Checklist
A needle choice doesn't live on its own. It has to fit the machine, the cartridge system, the studio's hygiene standards, and the way the artist plans to build the tattoo from outline to finish. Reputable studios use single-use, pre-sterilized cartridges, and the cartridge has to match the grip and machine system the artist is running. This sterilization guide is the right kind of read if you care about what clean setup looks like in practice.
What to look for in the room
The studio should feel organized, with sealed consumables, clear setup habits, and a workflow that doesn't improvise sterility. You don't need to audit the whole shop, but you can absolutely notice whether the artist opens fresh cartridges, changes them cleanly, and keeps the work area controlled. That tells you more than a sales pitch does.
Think Tank Tattoo in Denver works with complimentary consultations, a $100 non-refundable deposit, a $100 shop minimum, and clients 18 and older. Those are straightforward booking facts, and they matter because a good consultation isn't just about style, it's about making sure the timeline, budget, and design all fit the project.
A consultation checklist you can actually use
Ask which gauge is planned for the outline. That tells you whether the artist expects the line to be sharp, bold, or delicate.
Ask which grouping will be used for shading or fill. That tells you whether the artist is planning a liner, shader, or magnum workflow.
Ask how the setup changes for your body area. Thin skin, thicker skin, and awkward angles don't all want the same approach.
Ask how aftercare will reflect the needle choice. Bigger coverage, more saturation, and denser work can change how the piece settles.
Ask what the artist would change if the design were scaled up or down. That reveals whether the setup is tied to the art or just habit.
The point of knowing tattoo needle sizes isn't to micromanage the artist. It's to ask sharper questions and understand the answer when you hear it. When you know the two axes, gauge and grouping, the conversation stops being “Will it hurt?” and starts being “How will it heal, and what does this setup do to get me there?”
If you want a consultation that starts with the right questions and ends with a tattoo built for your design, book time with Think Tank Tattoo. The studio works through needle choice, placement, and aftercare with the same practical attention it brings to the tattoo itself. If you're planning your first piece or a larger custom project, that's the place to start.
Comments