
Tattoo Care Advice for Perfect Healing
You've just left the studio, the tattoo is bright, tender, and probably covered with the dressing your artist applied. It's tempting to admire it, show it around, and get back to your day. Instead, treat the next stage as wound care. The way you handle the fresh skin affects infection risk, comfort, and how cleanly the design settles.
That matters even more with a large sleeve, back piece, or other multi-session project. One area may be fully healed while another is still peeling, so “take care of the tattoo” becomes a zone-by-zone responsibility. Good tattoo care advice is practical, consistent, and willing to distinguish normal irritation from a problem that needs medical attention.
Table of Contents
Treating Your Fresh Ink Like an Open Wound - The first decisions matter
The Daily Washing and Moisturizing Protocol - Use a light touch - More product isn't better
Navigating the Itchy and Flaking Healing Stages - Let the skin detach by itself
Spotting Infections and Delayed Allergic Reactions - Know when the pattern changes - Delayed reactions aren't always an aftercare failure
Managing Sun Exposure and Multi-Session Projects - Divide large projects into healing zones
The Essential Dos and Donts of Tattoo Aftercare - Do - Don't
Treating Your Fresh Ink Like an Open Wound
A fresh tattoo isn't just finished artwork. Needles have breached the skin barrier, leaving an exposed area vulnerable to friction, dirty hands, contaminated surfaces, and microorganisms. The U.S. Food and Drug Administration's tattoo safety guidance explains that infections can arise from unsterile equipment, poor hygiene, reused ink, or contaminated ink, even when a sealed container was used and the artist followed appropriate hygienic procedures.
That's why aftercare is an infection-prevention routine, not merely a cosmetic ritual. The initial bandage or second-skin dressing provides a temporary barrier against contact and contamination, but it isn't permission to ignore the area. Follow the studio's instructions for how long that specific covering should remain in place. A traditional bandage, adhesive film, and other dressings can have different removal instructions.
The first decisions matter
Before you touch the tattoo, wash your hands. Keep pets, curious friends, dirty clothing, and unnecessary contact away from the area. When it's time to remove the covering, do it according to the instructions you were given rather than copying someone else's routine from social media.
A practical rule is simple:
Treat fresh ink like damaged skin. Clean it gently, keep products light, and protect it from friction, soaking, and avoidable contact.
The studio's written instructions should take priority because the dressing, placement, amount of ink, and technique all affect the routine. Think Tank Tattoo's tattoo aftercare film guidance is useful when you've been sent home with an adhesive film and need to confirm the removal approach.
As the surface recovers, your aim is to support the skin barrier without suffocating it. If you're looking for broader information about how skin barriers recover after irritation, this guide to rebuilding your skin barrier offers relevant background, but it shouldn't replace the tattoo-specific directions from your artist or a clinician.
The Daily Washing and Moisturizing Protocol
The best routine is boring and repeatable. Wash your hands first, remove the dressing only as directed, cleanse without friction, dry thoroughly, and apply a thin product layer. The process protects the tattoo because each step limits the chance of transferring bacteria or mechanically damaging the healing surface.
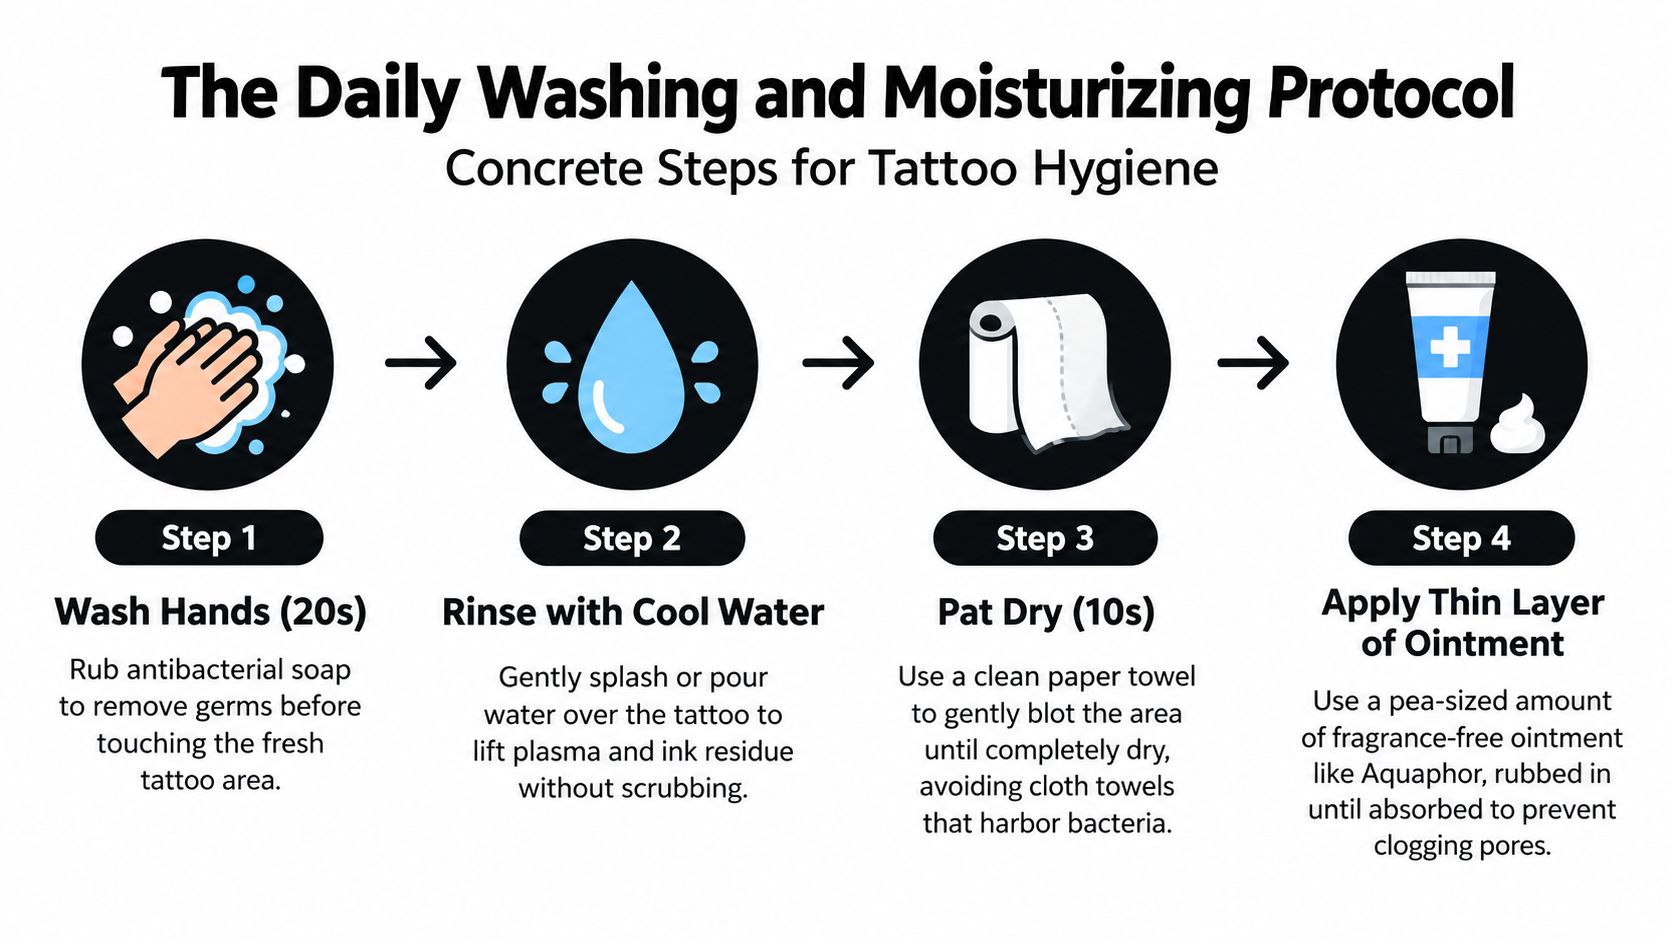
Use a light touch
Wash your hands. Use soap and water before touching the dressing, tattoo, or product container. Clean hands are the first control against transferring contamination.
Remove the covering as instructed. Don't rip it off dry or extend the wear time because you think more coverage is always safer. If the dressing is difficult to remove, lukewarm water may help loosen it, provided that approach fits your artist's instructions.
Clean the tattoo gently. Use lukewarm water and a mild, fragrance-free soap. Let water flow over the area without directing a forceful spray at it. Don't scrub with a washcloth, sponge, loofah, or exfoliating tool.
Pat dry. Use a clean disposable paper towel and blot rather than rub. A cloth towel can hold lint and microorganisms, while friction can disturb the fragile surface.
Moisturize sparingly. Apply only a thin layer of a simple moisturizer or artist-recommended ointment. The skin should not look heavily coated, greasy, or sealed under a thick film.
The historical protocol described by Harvard Health's tattoo infection guidance used gentle washing, careful drying, brief air exposure, and a very thin ointment layer, with a later move to ordinary moisturizer as shedding began. Current dressing systems and artist instructions vary, so don't combine an older routine with a newer film protocol without checking first.
More product isn't better
Over-moisturizing is one of the easiest mistakes to make. A thick layer can trap moisture, increase irritation, and leave the tattoo feeling sticky. You're trying to reduce excessive dryness and friction, not create an airtight coating.
Wash and moisturize according to the studio's directions, commonly around twice daily for a straightforward healing routine. If the tattoo is weeping heavily, increasingly painful, or reacting to a product, stop experimenting and seek advice from the studio or a healthcare professional.
Navigating the Itchy and Flaking Healing Stages
The tattoo often looks less impressive before it looks settled. Early redness and soreness give way to tightness, itching, and flakes. The surface can appear cloudy, dull, or uneven while the outer layer sheds. That “ugly phase” doesn't mean the design has failed.
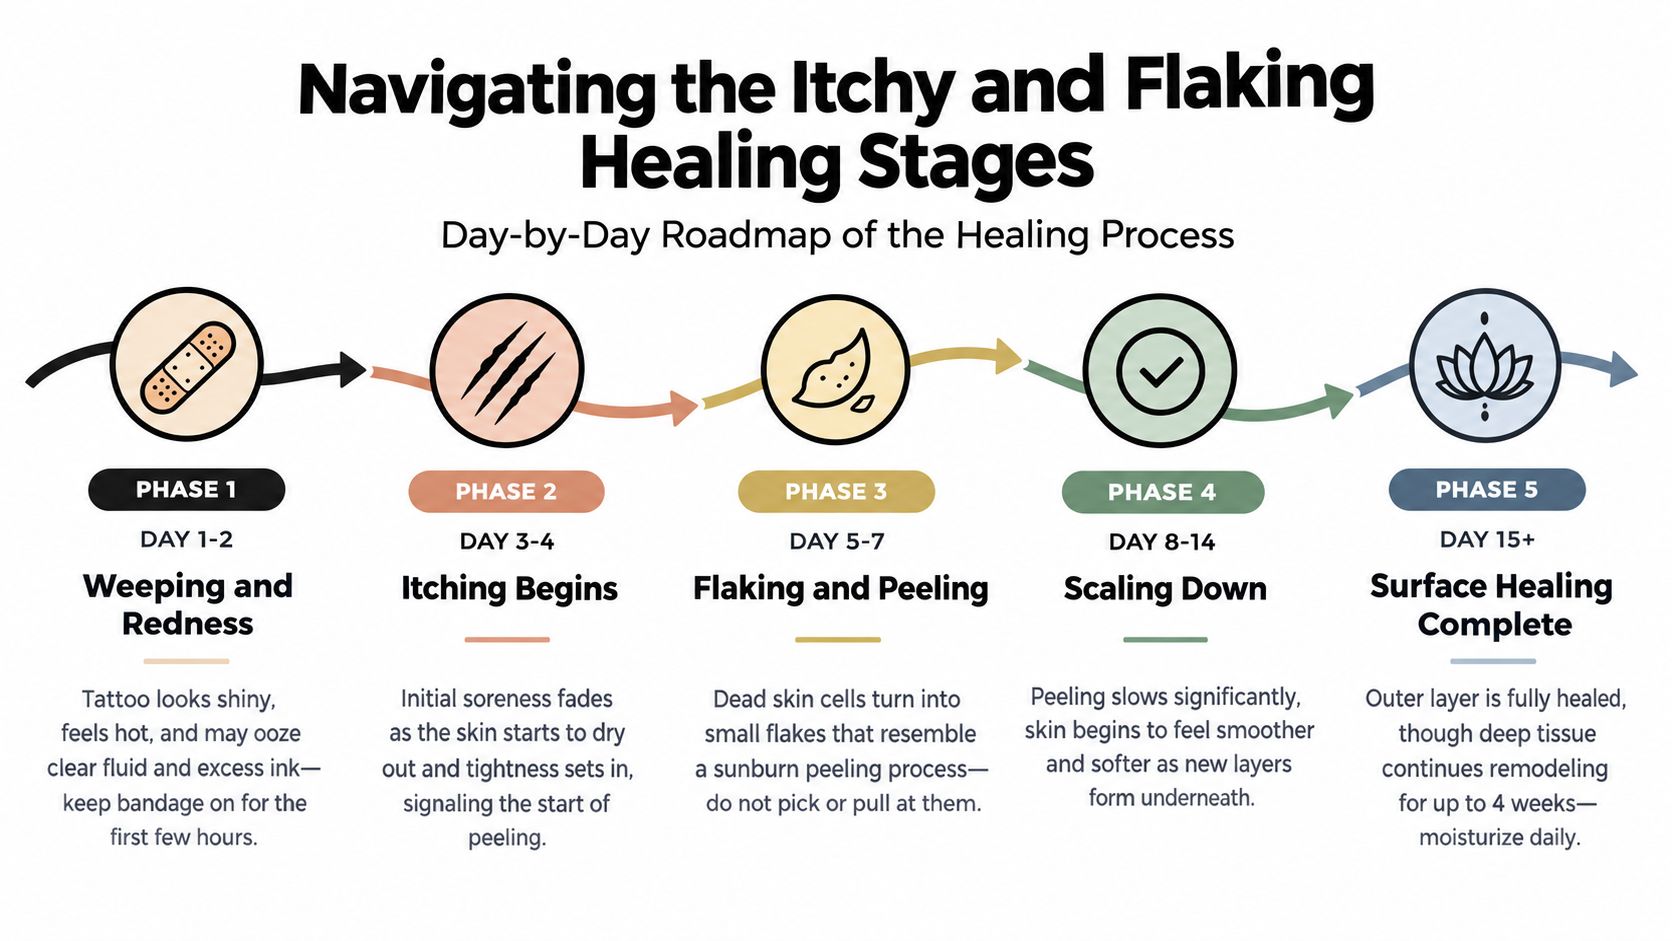
A client with a large forearm piece may see clear fluid and excess ink residue early on, followed by tight skin and small flakes. Later, the tattoo can look muted beneath a thin layer of recovering skin. These changes can be unsettling, especially when the artwork looked crisp immediately after the appointment, but peeling is a reason to become more disciplined, not more aggressive.
Let the skin detach by itself
Never pick scabs, pull flakes, scratch through the itch, or exfoliate the area. Those actions can remove recovering skin before it's ready and may contribute to uneven healing, scarring, or lost-looking color. Keep fingernails short if you're prone to scratching in your sleep, and choose loose, breathable clothing that won't catch on flakes.
For the itch, try a cool compress placed gently over clean fabric rather than rubbing the tattoo. A light tap near the area can be less damaging than dragging fingernails across it, but don't turn tapping into repeated irritation. Keep moisturizing light and consistent, since piling on product usually makes the surface feel worse rather than calmer.
The difficult stage is often the stage where restraint protects the artwork most. If a flake is ready to leave, it will come away without your help.
Normal healing can include soreness, warmth, itching, peeling, and some scabbing. The direction matters: symptoms should generally stabilize rather than become progressively more intense. Think Tank Tattoo's guide to healing stages of a tattoo can help you compare ordinary changes with signs that deserve attention.
The surface may look finished before deeper repair is complete. Continue treating the area gently even when the tattoo appears attractive again, particularly if the design contains dense shading or covers a large section of skin.
Spotting Infections and Delayed Allergic Reactions
Mild redness, swelling, warmth, soreness, clear fluid, and peeling can occur during normal healing. The concern is a pattern that moves in the wrong direction, especially when redness expands, pain escalates, or the tattoo becomes hotter and more tender instead of gradually settling.
Photographing the tattoo in consistent lighting can make changes easier to judge. Compare the edge of the redness rather than relying only on how the center looks. You can also note pain and temperature trends, then contact a healthcare professional promptly if the overall picture is worsening.
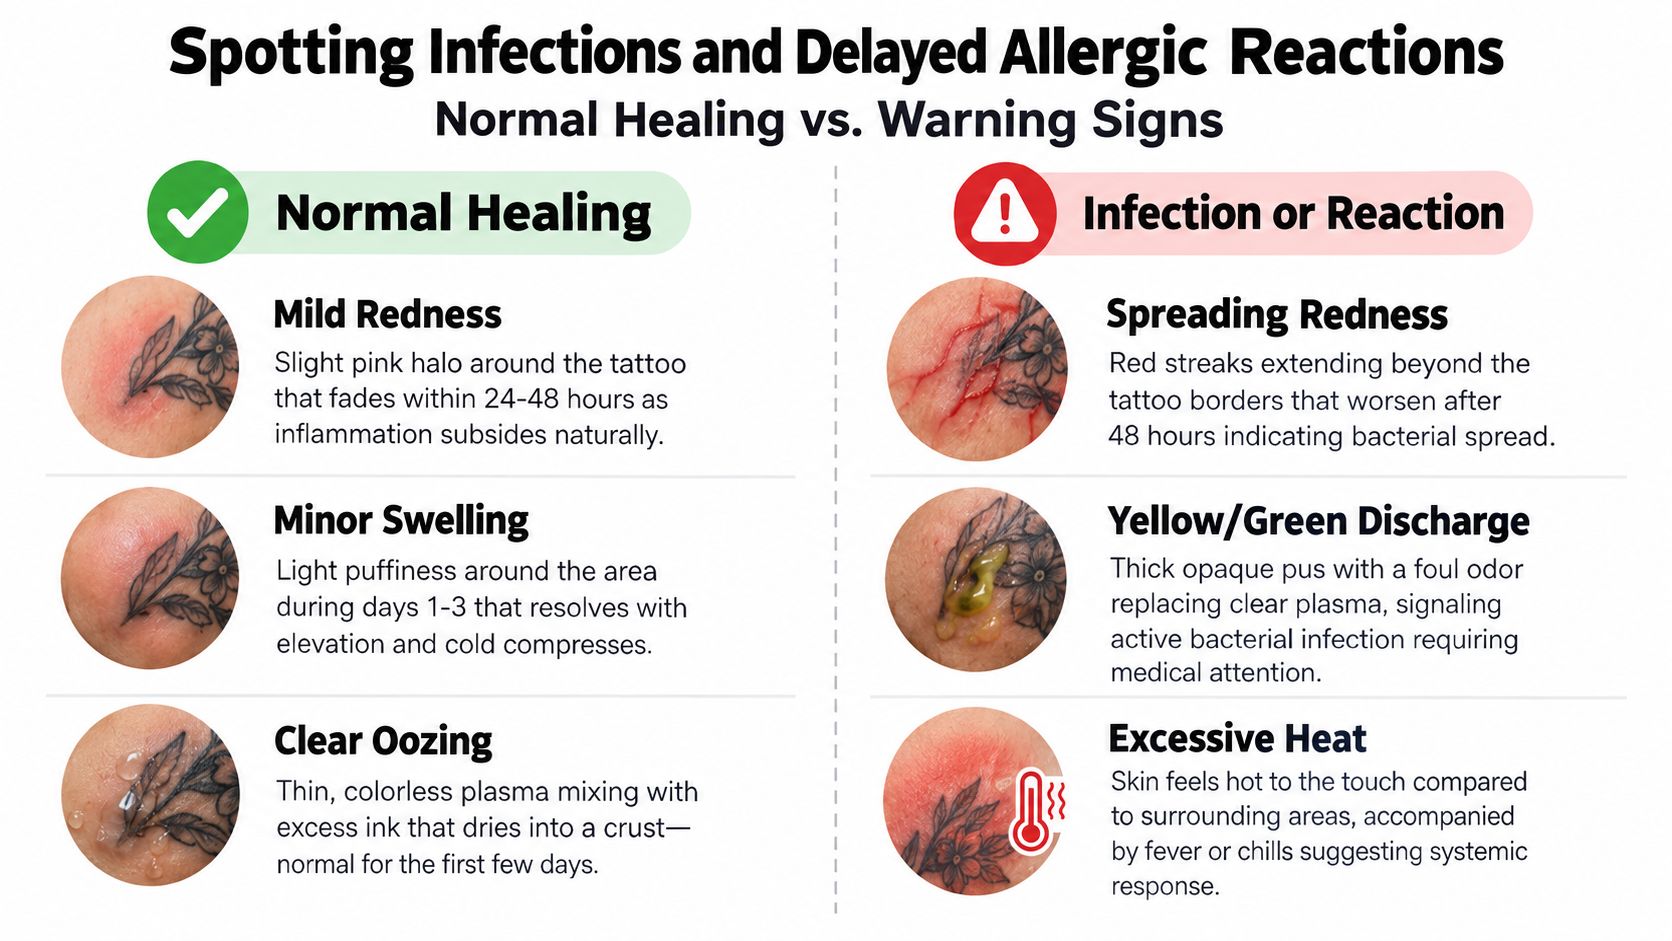
Know when the pattern changes
Seek medical evaluation for spreading redness, increasing warmth, worsening tenderness, pus-like drainage, red streaking, fever, chills, or a rash. Severe infections can require prolonged antibiotic treatment, hospitalization, surgery, or intravenous medication, so waiting to see whether a serious reaction disappears isn't a sensible aftercare strategy. The warning signs of infected wounds provide useful general context for recognizing changes that need professional assessment.
Don't pour harsh antiseptics onto the tattoo, cover it with thick occlusive products, or use leftover antibiotics. Those choices can irritate healing skin, obscure the symptoms, or delay the right diagnosis. Contact the studio for help interpreting a photo or discussing the products you used, but contact a clinician when infection is possible.
Delayed reactions aren't always an aftercare failure
A persistent bump, rash, or itchy patch doesn't automatically mean you washed incorrectly. Tattoo hypersensitivity can begin immediately or appear much later, remain chronic, and affect only one ink color. The American Academy of Dermatology notes that at least one-third of persistent tattoo-intolerance reactions are reported to be allergic, and ordinary patch testing can be falsely negative because tattoo pigment sits deeper in the skin. Read the AAD guidance on tattoo skin reactions before assuming that more washing or more ointment will solve the problem.
Color-specific bumps or a rash that persists after the surface seems healed deserve dermatology advice. If you also have facial swelling, breathing difficulty, widespread hives, fever, or other systemic symptoms, seek urgent medical help rather than waiting for an artist's reply.
Managing Sun Exposure and Multi-Session Projects
“Protect it from the sun” isn't one instruction for every stage. A fresh or weeping tattoo shouldn't be treated like healed skin, and sunscreen can irritate an actively open wound. During the vulnerable stage, breathable clothing and shade are usually more appropriate protection than applying a product directly to the tattoo.
Denver clients also need to plan around outdoor work, dry conditions, travel, and intense high-altitude sun. Keep a fresh tattoo covered with loose clothing that doesn't stick or rub, and don't use tanning beds. Once the surface has healed, use a broad-spectrum, water-resistant SPF 30 or higher on exposed tattooed skin, as advised by Mayo Clinic's tattoo and piercing guidance. Sunscreen helps limit ultraviolet fading, but it never replaces early infection precautions.
Divide large projects into healing zones
A sleeve may contain older sections that can handle normal outdoor exposure and a newly completed section that is still peeling. Treat those areas differently. Cover the newest zone with breathable fabric, avoid applying sunscreen to it until the surface has healed, and continue protecting the finished sections with sunscreen when they're exposed.
The same principle applies to a back piece completed over multiple appointments. Keep notes or take photographs so you know which parts are fresh, peeling, or fully healed. Don't let a healed border persuade you that the entire project is ready for swimming, soaking, or full sun.
If sun exposure leaves healed skin irritated, a resource on organic aloe spray for sunburn relief may be useful for general sunburn comfort. Don't spray unapproved products onto a fresh, open tattoo, and don't use after-sun relief as a substitute for covering healing ink.
For collectors, stage-based care works better than a single blanket rule:
Fresh: Keep the dressing on as directed, wash gently, and protect the area from sun and contact.
Peeling: Continue light cleansing and moisturizing, avoid scratching, and use loose clothing.
Fully healed: Apply broad-spectrum, water-resistant SPF 30 or higher when outdoors.
Between sessions: Treat every newly tattooed section as fresh, even when adjacent areas have already settled.
The Essential Dos and Donts of Tattoo Aftercare
The first two weeks reward consistency more than complicated products. If you're tired, itchy, or unsure, return to the basic test: does this action reduce contamination and friction, or does it add them?
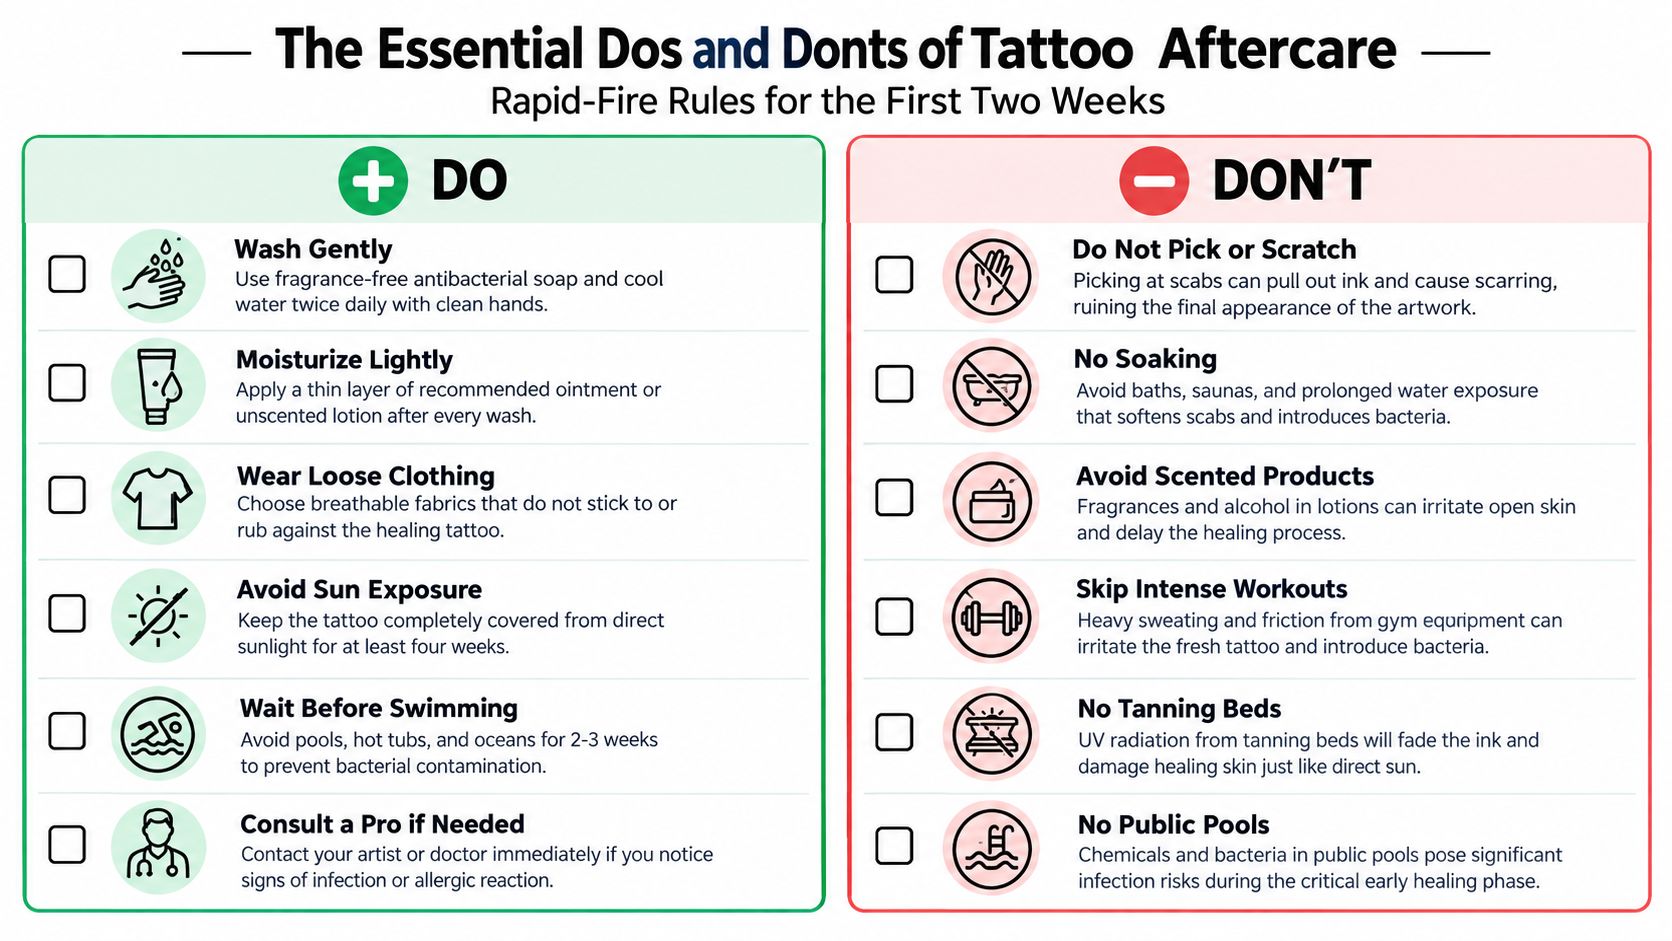
Do
Wash gently: Use clean hands, lukewarm water, and mild fragrance-free soap.
Dry carefully: Pat with a clean disposable towel instead of rubbing.
Moisturize lightly: Use one simple, recommended product and avoid thick layers.
Wear loose clothing: Reduce rubbing, pressure, sweat, and fabric contact.
Keep bedding clean: Avoid sleeping directly on the tattoo when possible.
Watch the trend: Photograph changes and escalate worsening redness, pain, discharge, fever, or unusual rash.
Don't
Don't pick or scratch: Let flakes and scabs detach naturally.
Don't soak: Avoid pools, hot tubs, baths, lakes, and rivers while the tattoo heals.
Don't exfoliate: Scrubs and rough tools can damage the recovering surface.
Don't use sunscreen too soon: Wait until the tattoo has healed at the surface, then protect it outdoors.
Don't rely on leftover medication: Suspected infection needs professional assessment.
Don't mix routines: Follow your artist's directions instead of layering advice from unrelated products and sources.
For product-specific guidance after the active healing stage, Think Tank Tattoo's tattoo lotion recommendations can help you choose a simple routine without turning aftercare into a cabinet full of competing formulas. Keep the studio's contact details available, but remember that medical warning signs belong with a healthcare professional.
Think Tank Tattoo offers custom tattoos, complimentary consultations, and aftercare guidance for first-time clients and collectors planning large, multi-session work. Visit Think Tank Tattoo in Denver to discuss your design, placement, healing plan, and the practical care your finished piece will need.
Comments