
Geometric Tattoos Shoulder: 7 Designs That Wrap the Deltoid
Why can the same geometric design look balanced on one person's shoulder and awkward on another's? The difference usually isn't the pattern. It's how the artist fits that pattern around the rounded deltoid, where the arm meets the chest and back, and how the skin shifts when the arm moves.
A shoulder isn't a flat drawing surface. A circle can look oval from an angle, a straight band can appear to climb, and a dense intersection can disappear around the edge of the arm. Placement needs to work with your relaxed posture, not just the position you hold while the stencil goes on.
For geometric tattoos, shoulder placement offers room for a complete cap, a restrained outline, or the beginning of a sleeve. The strongest choice depends on whether you want radial symmetry, a readable subject, or a repeating wrap. These designs offer different ways to handle the curve, with practical trade-offs in spacing, movement, clothing friction, and future expansion.
Table of Contents
1. Sacred Geometry Mandala Shoulder Cap - Center the Pattern on the Body
2. Dotwork Geometric Shoulder Piece - Let Healing Set the Session Pace
3. Geometric Animal Shoulder Design (Polygon or Low-Poly Style) - Keep Recognition in the Larger Shapes
4. Geometric Chevron and Triangle Band - Test the Entire Wrap
5. Minimalist Line Geometry with Negative Space - Choose Restraint, Not Fragility
6. Geometric Sunburst or Radial Shoulder Piece - Space the Center Generously
7. Geometric Landscape or Mountain Silhouette Shoulder - Put the Main Peak Where It Stays Visible
From Idea to Ink Without Fighting the Shoulder's Shape - Bring a Brief That Helps the Artist
1. Sacred Geometry Mandala Shoulder Cap
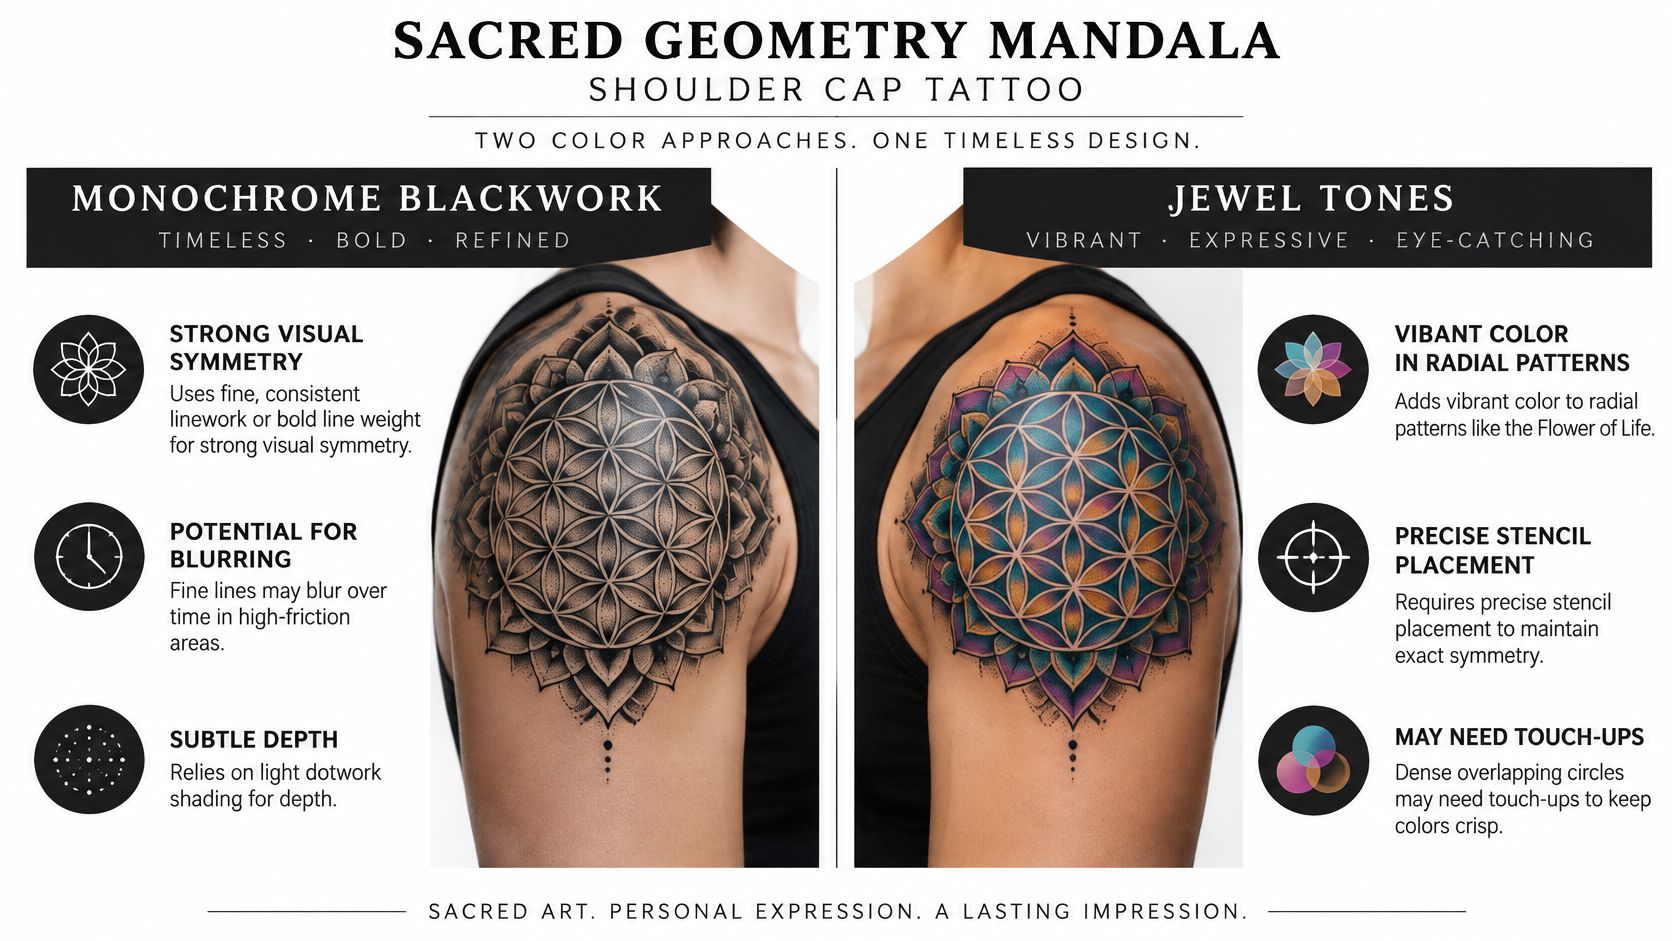
A Flower of Life shoulder cap works best when its overlapping circles have enough room to remain distinct. A Metatron's Cube composition needs similar breathing space, especially where diagonal lines converge. Shrinking either pattern to avoid extending onto the upper arm often creates more problems than it solves.
Compare how blackwork and jewel-tone treatments organize the same rounded placement.
Center the Pattern on the Body
The artist should mark the shoulder's visual center while you're standing naturally, then check the stencil from the front, side, and back. A full cap wraps beyond what you can see in a mirror. A partial mandala leaves an open edge that can connect more easily to chest or sleeve work.
Structured line-based tattooing has deep historical precedents, but that doesn't make every modern sacred-geometry symbol part of the same tradition. The archaeological discussion published through UNC Press describes early linear tattoos and patterned traditions with distinct cultural contexts. Choose a symbol for a meaning you understand rather than assigning it a universal spiritual definition.
Placement rule: Aim for visual balance in your normal posture, not an apparently perfect circle from every possible angle.
For a shoulder-to-chest piece, keep the central mandala readable and let outer arcs form the connection. Don't force small intersections into the front shoulder crease, where movement complicates their appearance and clothing may rub during healing.
Use the video as another visual reference when discussing pattern density.
2. Dotwork Geometric Shoulder Piece
Dotwork suits a shoulder when you want geometry without a hard perimeter. A hexagonal grid can hold its structure across the deltoid while stippled shading fades toward the upper arm or trapezius. That transition feels less abrupt than ending every shape against a heavy outline.
The important distinction is between intentional density changes and inconsistent shading. A gradient should become lighter according to the design, not because the artist has lost the pattern around the back of the shoulder. Our guide to dotwork tattoo style explains how stippling creates texture and tonal transitions.
For a practical example, use outlined hexagons over the outer shoulder, darker dotwork toward the rear, and an open fade toward the collarbone. The open area keeps the upper edge from looking like a solid patch.
Review healed work: Look for clear transitions and readable shapes, not just the dramatic contrast of fresh ink.
Map the fade: Decide where the dots stop before tattooing begins, especially near a future chest connection.
Plan clothing contact: Tell the artist about backpack straps, fitted workwear, or sports equipment that crosses the placement.
Let Healing Set the Session Pace
Dense stippling still creates a healing wound. Don't assume a soft-looking tattoo needs less care or can be worked again before the skin has recovered.
For larger coverage, divide the composition along sensible pattern boundaries. Schedule the next session around the condition of the skin and the artist's assessment, rather than treating a fixed calendar gap as proof that healing is complete.
3. Geometric Animal Shoulder Design (Polygon or Low-Poly Style)
A wolf's face needs to read as a wolf before the viewer notices its triangular construction. Facial placement matters more than facet count. Put the eyes and muzzle across the most consistently visible part of the outer shoulder, and use the wrapping edges for ears, fur shapes, or background geometry.
This wolf design shows how a recognizable silhouette can carry detailed internal structure.
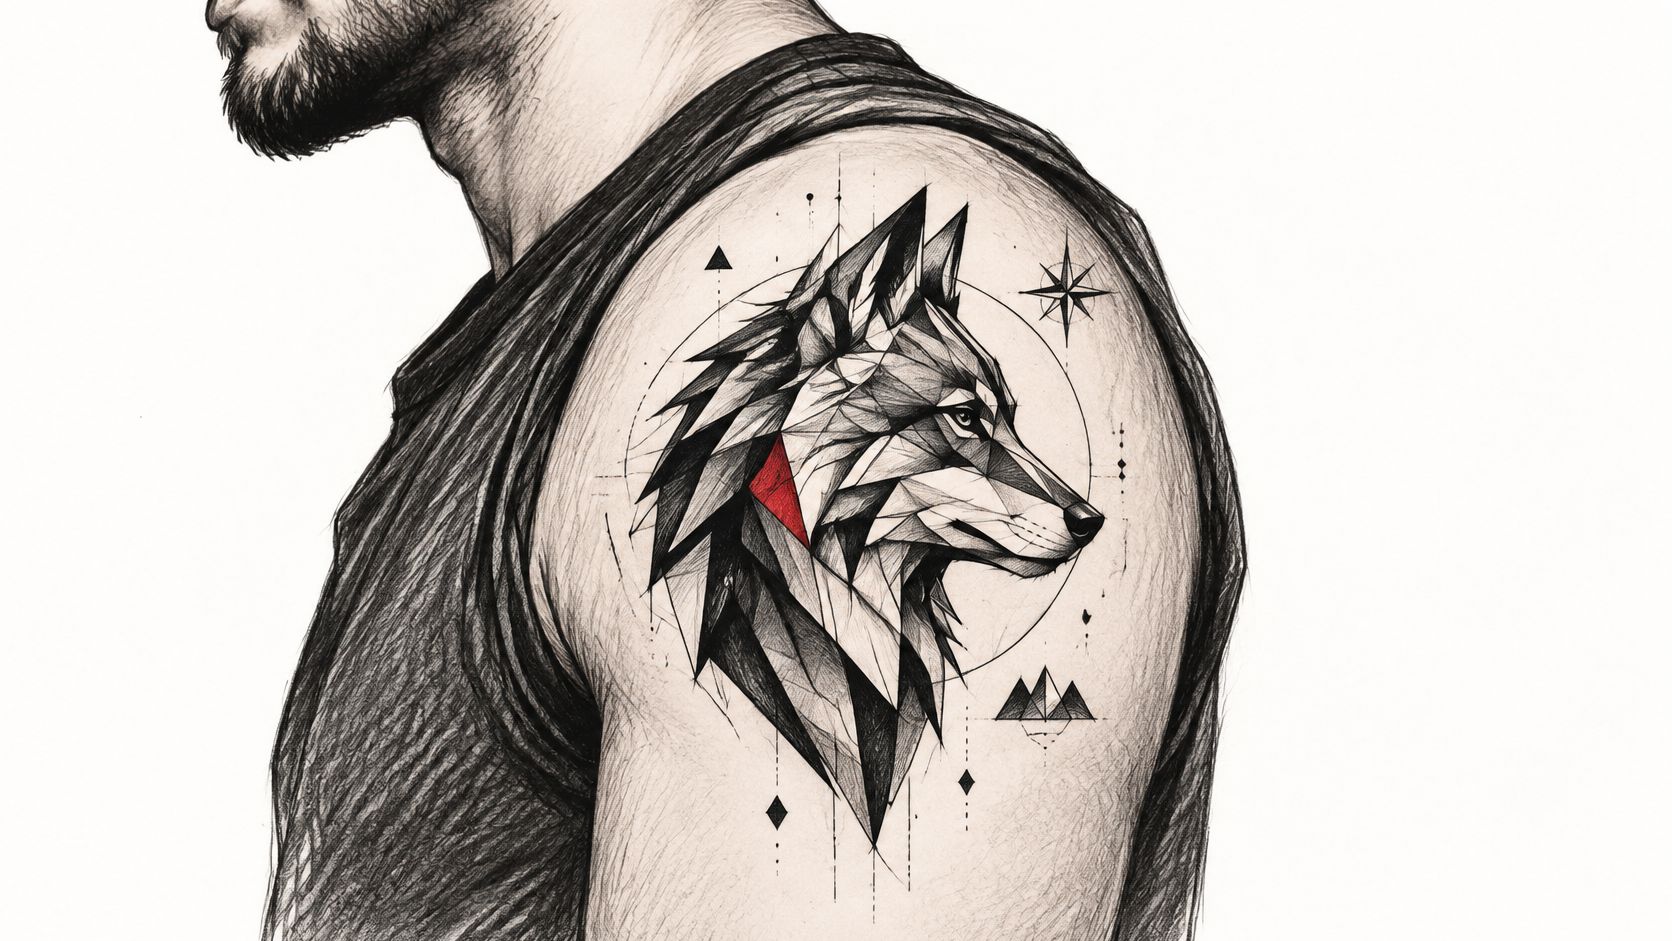
A front-facing animal placed too far forward can lose part of its face around the deltoid. Moving it slightly back may improve the side view but reduce its visibility from the front. That's a real trade-off, not something extra detail will fix.
Keep Recognition in the Larger Shapes
For a polygonal fox, use the ears, cheek angles, and muzzle to establish the subject. Smaller triangles should support those features rather than compete with them. If you prefer a heavier silhouette, geometric bear tattoo designs offer another way to combine animal anatomy with angular construction.
Bring references showing the animal's head angle as well as the geometric treatment you like. A profile bird, for example, can follow the rear shoulder into the shoulder blade more naturally than a rigid, front-facing head.
A recognizable animal with fewer, larger facets is usually a stronger shoulder design than a crowded network of tiny triangles.
Keep critical facial lines away from an edge that disappears when your arm rests against your body. During healing, choose clothing that doesn't repeatedly catch or scrape across the tattooed shoulder.
4. Geometric Chevron and Triangle Band
A band has to close convincingly around a curved, tapering body part. Repeating triangles that look evenly spaced on a flat printout may bunch together where the shoulder narrows toward the upper arm. The artist needs to map the whole route, including the section you won't easily see.
This sketch illustrates how repeated angular motifs can follow the shoulder and upper arm.
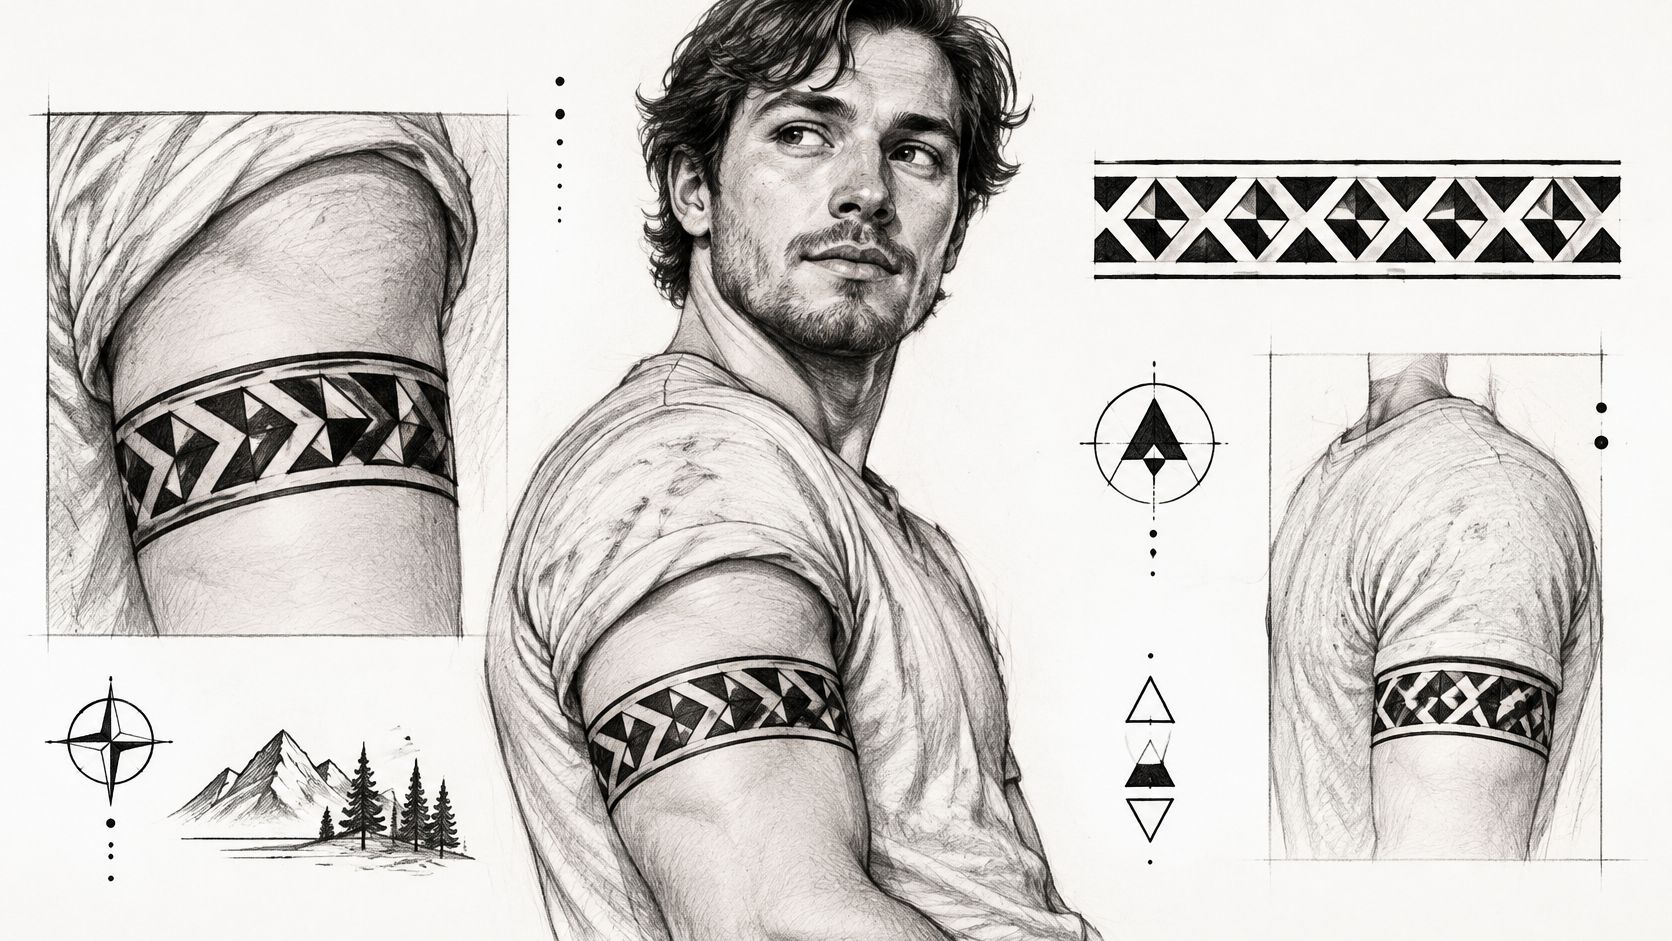
A diagonal chevron strip running from the rear shoulder toward the outer arm can be easier to integrate than a rigid horizontal band. It gives the artist room to follow the deltoid's slope without pretending the shoulder is a cylinder.
Test the Entire Wrap
Before committing, inspect the stencil with your arm relaxed, extended, and gently rotated. Pay particular attention to the join: an abrupt change in triangle width can look accidental even when the visible front section is clean.
Keep the rhythm consistent: Adjust the overall layout rather than squeezing a narrow triangle into the final gap.
Choose the ending deliberately: A complete band feels contained; an open diagonal can connect to later work.
Protect future space: Leave usable skin above or below the band if a sleeve is likely.
For example, a broad chevron band can anchor a future geometric sleeve, but tightly framing it with parallel borders may make the next section harder to connect. Open edges offer flexibility.
Avoid treating culturally specific patterned tattooing as a generic source of interchangeable motifs. If you want a purely graphic result, build the band from an original arrangement of chevrons and triangles rather than copying an identifiable traditional composition.
5. Minimalist Line Geometry with Negative Space
A single hexagon on the outer shoulder can be more demanding than a dense pattern. There's nowhere to hide an uneven corner, and the surrounding untouched skin makes every line easy to compare. Minimal doesn't mean technically forgiving.
Intersecting arcs offer a different option. Instead of asking a rigid polygon to remain visually regular across the deltoid, the artist can place sweeping curves that acknowledge the shoulder's shape. Our guide to negative-space tattoo designs explores how untouched skin can form part of the composition rather than surround it.
Choose Restraint, Not Fragility
For a subtle shoulder tattoo, I'd prioritize a clear outline and generous spacing over the thinnest possible needle mark. A slightly stronger line can still look restrained. Crowding delicate parallel lines into a narrow strip sacrifices the openness that makes this style appealing.
UV exposure also deserves attention. An experimental pigment study demonstrated pigment loss under irradiation in a mouse model, establishing a mechanism rather than predicting how much a human tattoo will fade. Don't interpret laboratory findings as a personal fading timetable.
Design judgment: If removing a line improves the composition, remove it before tattooing rather than expecting a touch-up to solve the layout.
Try a hexagon stencil with your arm hanging naturally, then raised. Some apparent distortion is unavoidable on moving skin. The useful question is whether the design remains intentional and readable, not whether it behaves like a printed diagram.
Assess faint or uneven areas only after healing, with the artist. A touch-up isn't automatically necessary.
6. Geometric Sunburst or Radial Shoulder Piece
Start with the center, not the rays. A sunburst placed high on the shoulder can send its longest rays down the outer arm, while shorter arcs turn toward the chest and back. Equal ray lengths on paper don't necessarily produce equal visual weight on the body.
For a bold example, combine solid black rays with open skin channels and lighter stippled accents. Solid elements establish the structure; the softer marks help the perimeter transition without filling every available gap.
Space the Center Generously
The tightest part of a radial tattoo is where the rays converge. If the center becomes crowded, shortening the rays won't solve it. Enlarge the open core, reduce the number of divisions, or alternate strong rays with lighter accents.
Check the focal point: Make sure the center looks deliberate from the viewing angle you care about most.
Follow the curve: Let ray lengths change as they travel toward the front and rear shoulder.
Keep channels open: Preserve visible skin between dark rays, particularly near the core.
Shoulder sunbursts also need practical sun care because sleeveless clothing leaves the cap exposed. A prospective tattoo-care evaluation found no significant deterioration in assessed tattoo appearance during its short-term use of an SPF 50+ product, but that isn't a lifetime guarantee.
Once the tattoo is fully healed, use broad-spectrum SPF 50+ when the shoulder is exposed. While it's healing, avoid direct sun and artificial tanning, and follow the artist's cleansing and moisturizing instructions. Don't substitute sunscreen for protecting an unhealed tattoo from exposure.
7. Geometric Landscape or Mountain Silhouette Shoulder
A mountain range doesn't need a perfectly straight horizon to look convincing. On the shoulder, a gently wrapping baseline often works better than a ruler-straight stripe that appears to tilt as it crosses the deltoid.
This mountain design uses a circular frame to connect the scenery to the rounded placement.
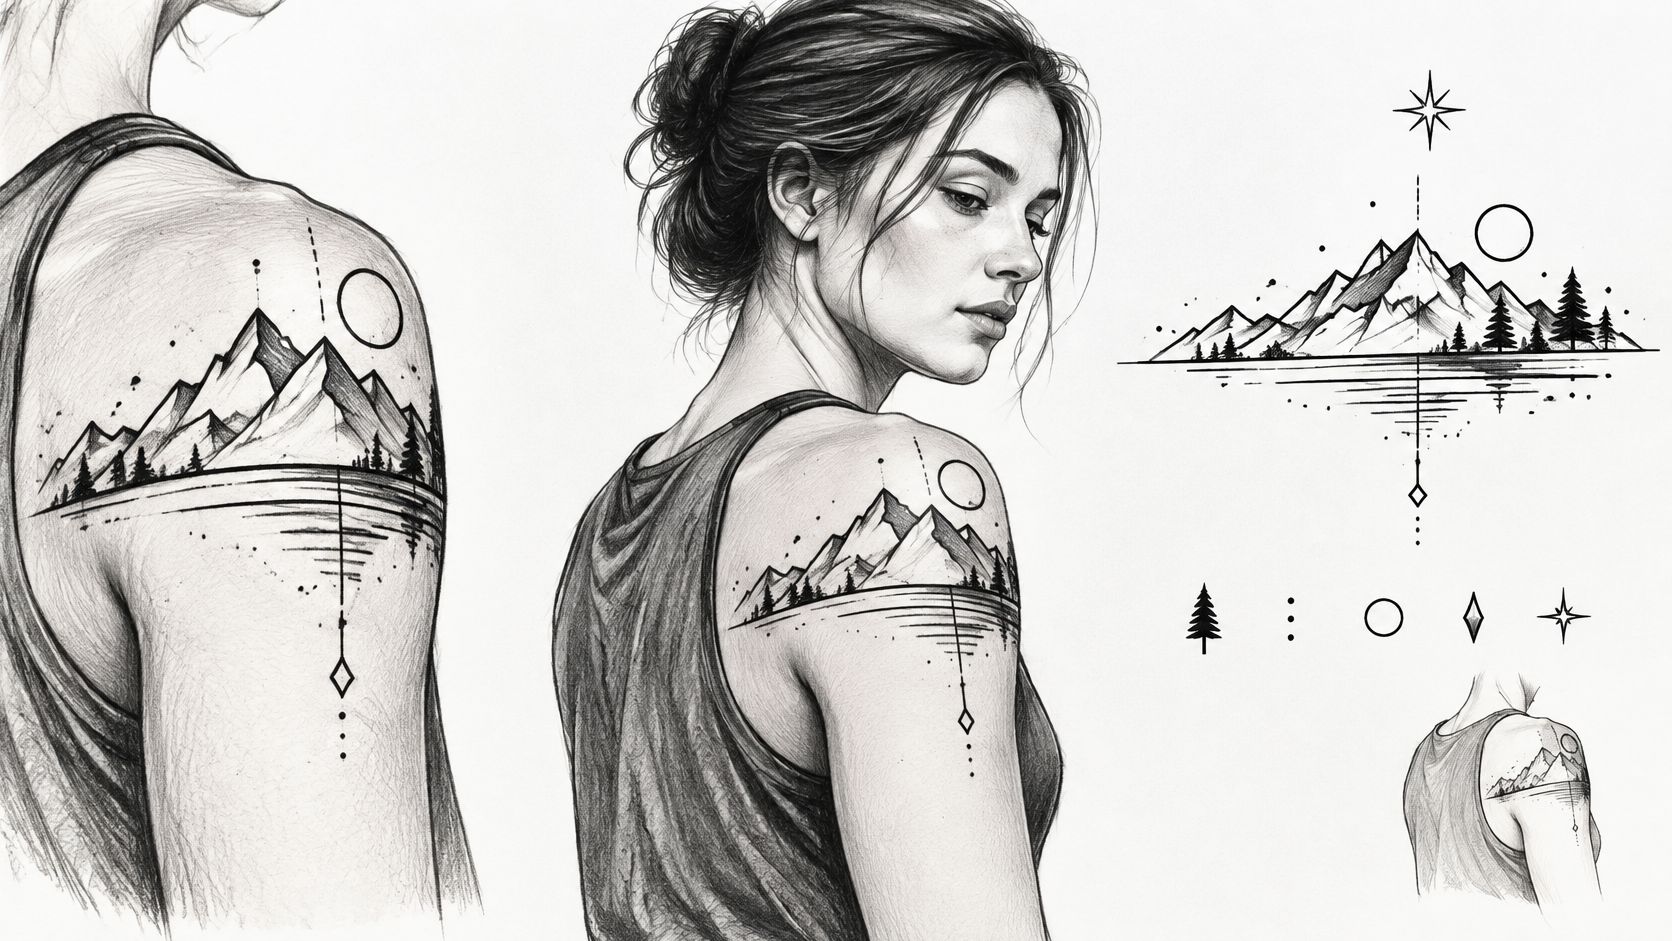
Bring a photograph of a meaningful place, then identify what makes it recognizable. It might be a distinctive summit, a saddle between peaks, or a particular shoreline. Keep that feature clear and simplify the less important terrain.
Put the Main Peak Where It Stays Visible
For a mountain silhouette wrapping toward the chest, position the defining summit on the outer shoulder rather than burying it in the front crease. Secondary peaks can turn around the arm. Geometric wave bands work similarly: establish the main crest in the visible area and let supporting lines wrap.
This style can expand into a sleeve, but plan the lower boundary before adding dense background triangles. A hard frame creates a finished panel; an open lower edge leaves more ways to continue.
Healing symptoms shouldn't be dismissed as part of getting a detailed tattoo. The clinical review of tattoo complications describes infection, hypersensitivity, and delayed inflammatory reactions, and notes that tattoos aren't a contraindication to MRI.
Seek medical advice for spreading redness, worsening pain, pus, fever, or persistent raised or itchy areas. If you later need shoulder imaging, tell the MRI staff about the tattoo, but don't delay medically necessary imaging because of it.
7 Geometric Shoulder Tattoo Styles at a Glance
Item | Best Placement | Line Style | Longevity | Session Commitment |
|---|---|---|---|---|
Sacred Geometry Mandala Shoulder Cap | Top and front of shoulder, extending onto upper arm | Fine, symmetrical lines with optional dotwork; blackwork or jewel tones | Fine intersections may blur and need touch-ups; bolder lines can last better | Moderate; allow time for precise stencil placement and possible touch-up |
Dotwork Geometric Shoulder Piece | Shoulder cap, upper arm, or outer deltoid | Stippled dots forming gradients, often with geometric outlines | Dots may soften or spread over time | High; detailed stippling takes longer and may require multiple visits |
Geometric Animal Shoulder Design (Polygon or Low-Poly Style) | Outer shoulder or deltoid, with the subject facing forward | Angular facets with bold outlines and solid or gradient fills | Bold facets tend to heal cleanly; intricate details may fade | Moderate; depends on the size and detail of the design |
Geometric Chevron and Triangle Band | Across the top of the shoulder, extending toward the bicep | Repeating bold black shapes with negative-space accents | Bold patterns generally hold up well; sharp points may soften with age | Moderate to high for large bands; careful planning may require multiple sessions |
Minimalist Line Geometry with Negative Space | Outer shoulder, top of deltoid, or shoulder blade | Thin, precise lines with generous negative space | Fine lines may fade or spread faster than bold designs | Low; a subtle, simple piece typically takes less time |
Geometric Sunburst or Radial Shoulder Piece | Top of the shoulder, centered on the deltoid | Radiating lines or rays with optional dots and concentric arcs | Tight rays and central details may blur or fade | Moderate; precise centering and spacing are important |
Geometric Landscape or Mountain Silhouette Shoulder | Top and outer shoulder, extending over the deltoid | Angular peaks and clean bands with optional fills or dotwork | Clear, spaced shapes tend to read well; crowded details may blur | Moderate; depends on composition and detail |
From Idea to Ink Without Fighting the Shoulder's Shape
The best geometric shoulder piece isn't necessarily the most intricate. It's the one with enough scale for its details, a convincing position on your deltoid, and room for the skin between its lines. A simple composition can outperform a crowded mandala if the design fits the anatomy and the mandala has been compressed to fit an arbitrary size.
Choose your main priority before the design gets complicated. If you want a centered cap, accept that some of it will wrap out of view. If you want a readable animal from the side, protect the face from the shoulder's turning edges. If a sleeve is likely, plan connection points before closing the shoulder inside a heavy border.
Bring a Brief That Helps the Artist
Bring reference images, a photograph of any meaningful subject, and a clear preference for blackwork, dotwork, color, or open linework. Explain what you like about each reference rather than requesting a direct copy. Mention nearby tattoos, outdoor work, training routines, and straps or uniforms that contact the shoulder.
For multi-session work, agree on the overall composition before finishing an isolated section. Session timing should account for skin recovery, the amount of work, and your ability to protect the area afterward. Don't book around a trip or activity that makes aftercare impractical.
At Think Tank Tattoo, we offer complimentary consultations to refine the concept, placement, scale, and timing. Our shop minimum is $100, and a $100 non-refundable deposit reserves your appointment once an artist or staff member directs you to send it. Don't send a deposit before receiving that direction.
Call or text (720) 932-0124, or email thinktanktattoo@gmail.com, to start the conversation. Bring your preferred design direction and tell us whether you want a finished shoulder piece or the beginning of something larger, so the planning reflects how your body moves and where the tattoo may go next.
Think Tank Tattoo offers custom tattoo design and collaborative placement planning in Denver. Visit Think Tank Tattoo to arrange a consultation and develop a geometric shoulder piece with deliberate spacing, a balanced wrap, and a clear plan for future expansion.
Comments