
Stencil Art Tattoo Explained: Process, Pros and Cons
You've saved the reference photo, you've picked the spot, and now you're sitting in the chair watching a purple outline get pressed onto your skin. It looks perfect while you're still. Then you bend your arm, twist to check the mirror, or breathe in, and the lines shift with you. That's the moment people realize a stencil art tattoo isn't a photocopy. It's a temporary map, and your body gets a vote in how that map reads.
That distinction matters more than the transfer itself. A clean stencil can lock in symmetry, spacing, and scale before any ink goes in, but it can't guarantee how fine lines will heal on mobile skin, how a curve will behave when you move, or whether a design copied exactly from a screen will stay readable in five years. I treat the stencil as a registration guide, useful, precise, and disposable. Decisions happen around it, in sizing, placement testing, and the changes your artist makes before the needle starts.
Table of Contents
Stencil Work Compared With Freehand Tattooing - How to Read the Trade-Off - Choosing by Situation
Materials and Equipment Behind a Stencil - Thermal Paper and the Printer - Transfer Solution and the Marker
From Design File to Stencil on Skin - Knowing When the Stencil Is Ready
Placement Decisions That Change the Final Stencil - Factors That Force an Adjustment
Preparing for a Stencil-Based Session - Why Disclosure Matters
Aftercare and Reactions to Watch For - Reading the Timeline - When Normal Stops Being Normal
What a Stencil Art Tattoo Is and Where It Came From
A stencil art tattoo is one whose design is first transferred to your skin as a temporary outline that shows your artist where every line and shape goes before any ink is placed. Think of a sewing pattern. The pattern doesn't make the dress, but it decides where each piece sits, how big it is, and how the parts line up. The stencil does the same job for a tattoo.
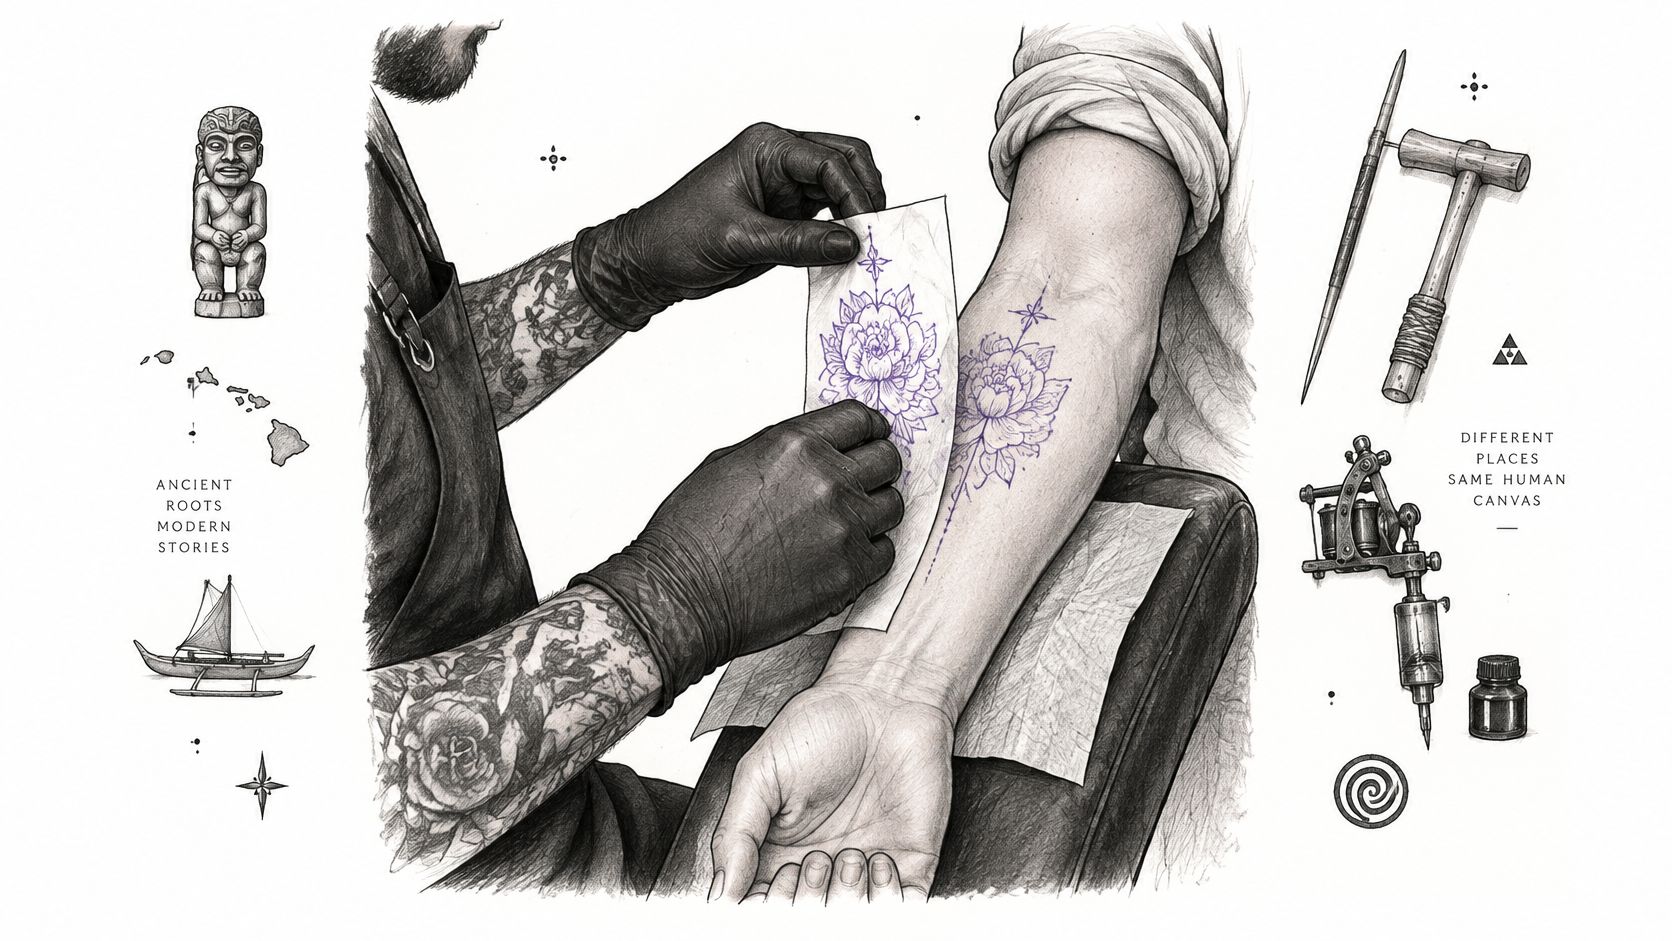
Say you bring in mirrored florals for both forearms. The stencil lets your artist print both sides at the same size, flip one, place them at matching heights, and check the pair together while you can still wipe everything off and start again. What it doesn't do is tattoo the piece for them. Linework, shading, and color still come from the artist's hand once the guide is approved.
The history is short. Thomas Edison patented the Electric Pen in 1876 to perforate paper into reusable stencils, and Samuel O'Reilly adapted that stencil principle for tattooing, receiving the first U.S. patent for an electric tattoo machine on December 8, 1891, by adding an ink reservoir to Edison's mechanism, as the ASME account of tattoo machine history describes.
Your first decision is simple. If your design is a clean, bold outline, a stencil will serve it well. If it's loose and painterly, expect freehand work to carry much of it.
Stencil Work Compared With Freehand Tattooing
Criterion | Stencil-based | Freehand |
|---|---|---|
Placement control | Fixed by a transferred template before needles start | Adjusted by eye during the session |
Repeat accuracy | High for mirrored, repeated or symmetrical shapes | Depends on the artist's skill and steadiness |
Design flexibility | Lower once the stencil is set; changes need a new transfer | High; the artist can adjust mid-session |
Prep time before the needle | Extra time for printing and the placement check | Less setup, more time spent on drawing |
Client sign-off | Approved on the printed stencil before any ink | Approved on a sketch, then adjusted on skin |
Best fit | Lettering, geometric pieces, mirrored pairs, multi-session work | Organic, painterly, flowing or loosely shaded designs |
How to Read the Trade-Off
A stencil fixes the geometry before the needle starts. That's why it suits symmetrical lettering, mirrored pairs, and geometric pieces where a small drift is obvious. It also suits multi-session work, because your artist has to land session two exactly where session one ended.
Freehand works the opposite way. Your artist draws on skin and can bend a curve, widen a gap, or follow a muscle mid-session. That live adjustment suits organic and flowing designs, where following your anatomy beats following a flat sheet of paper.
A stencil gives you a preview you can approve. It doesn't give you a better design than the one you approved.
Choosing by Situation
Choose a stencil when the design must align exactly with a body feature, match an existing piece, or repeat perfectly on both sides.
Choose freehand when the piece depends on the artist's live judgment about flow, wrap, and how the shape moves with you.
Combine both when a printed stencil sets the main outline and freehand marker work adds texture, filler, or shading guides around it.
I recommend the combined approach more often than clients expect. Large work rarely fits one sheet, and a marker in the artist's hand solves what paper can't. The limit stays the same either way. A stencil can't rescue a design that was wrong to begin with. If the drawing has cramped detail, weak contrast, or the wrong proportions, transferring it perfectly just preserves the problem.
Materials and Equipment Behind a Stencil
Item | Role | Practical note |
|---|---|---|
Thermal stencil paper | Carries the printed design onto the skin | Single-use; check for smudges before application |
Thermal copier or stencil printer | Heat-prints the design onto the paper | Heat settings change line crispness; test before a session |
Transfer solution | Helps the stencil adhere and release cleanly | Use only products whose ingredients the artist has checked |
Tattoo stencil marker | Fixes faint or missing lines before tattooing | Use only on the skin area the artist has cleared |
Black and colored tattoo ink | Deposits pigment after placement is approved | Colors carry individual reaction risk; ask for ingredient information |
Single-use gloves and surface disinfectant | Keeps the workstation and stencil area clean | Change gloves between clients and steps |
Thermal Paper and the Printer
Thermal stencil paper carries your design through heat. The printer or copier burns the image into the paper's transfer layer, and that layer is what ends up on your skin. The pairing matters. A printer set too hot can thicken lines and close up small gaps, while one set too cool gives you a faint transfer that wipes away during the first pass. Good shops test their settings before you're in the chair, not on you.
Paper quality shows up the same way. A crisp, dark transfer with clean edges means your artist spends the session tattooing. A patchy one means they spend it reconstructing lines from memory and a reference photo.
Transfer Solution and the Marker
Transfer solution is the bit clients rarely think about. It wets the skin so the design releases from the paper and sticks, and it stays on your skin under the stencil. Your artist should know what's in the product they're using and be able to tell you. If you've reacted to cosmetics or adhesives before, that conversation matters.
The stencil marker handles everything the paper can't. Your artist uses it to repair a line that smudged during placement, extend a design around a curve, or mark reference points for symmetry. It should be skin-safe, visible through prep and wiping, and treated as single-use.
Practical rule: A stencil that smudges, tears, or lifts unevenly gets reprinted. Forcing a bad transfer onto skin saves two minutes and costs accuracy for the whole session.
Ink gets covered in the preparation section because it carries its own reaction risk, separate from the transfer. Gloves and disinfectant run underneath everything. Fresh gloves between steps and a disinfected workstation aren't presentation, they're how the stencil area stays clean from print to skin.
From Design File to Stencil on Skin
The stencil is a temporary registration system. It converts approved artwork into a guide positioned on skin so your artist can reproduce proportions, alignment, and major contours before pigment goes in. Here's how that conversion takes place.
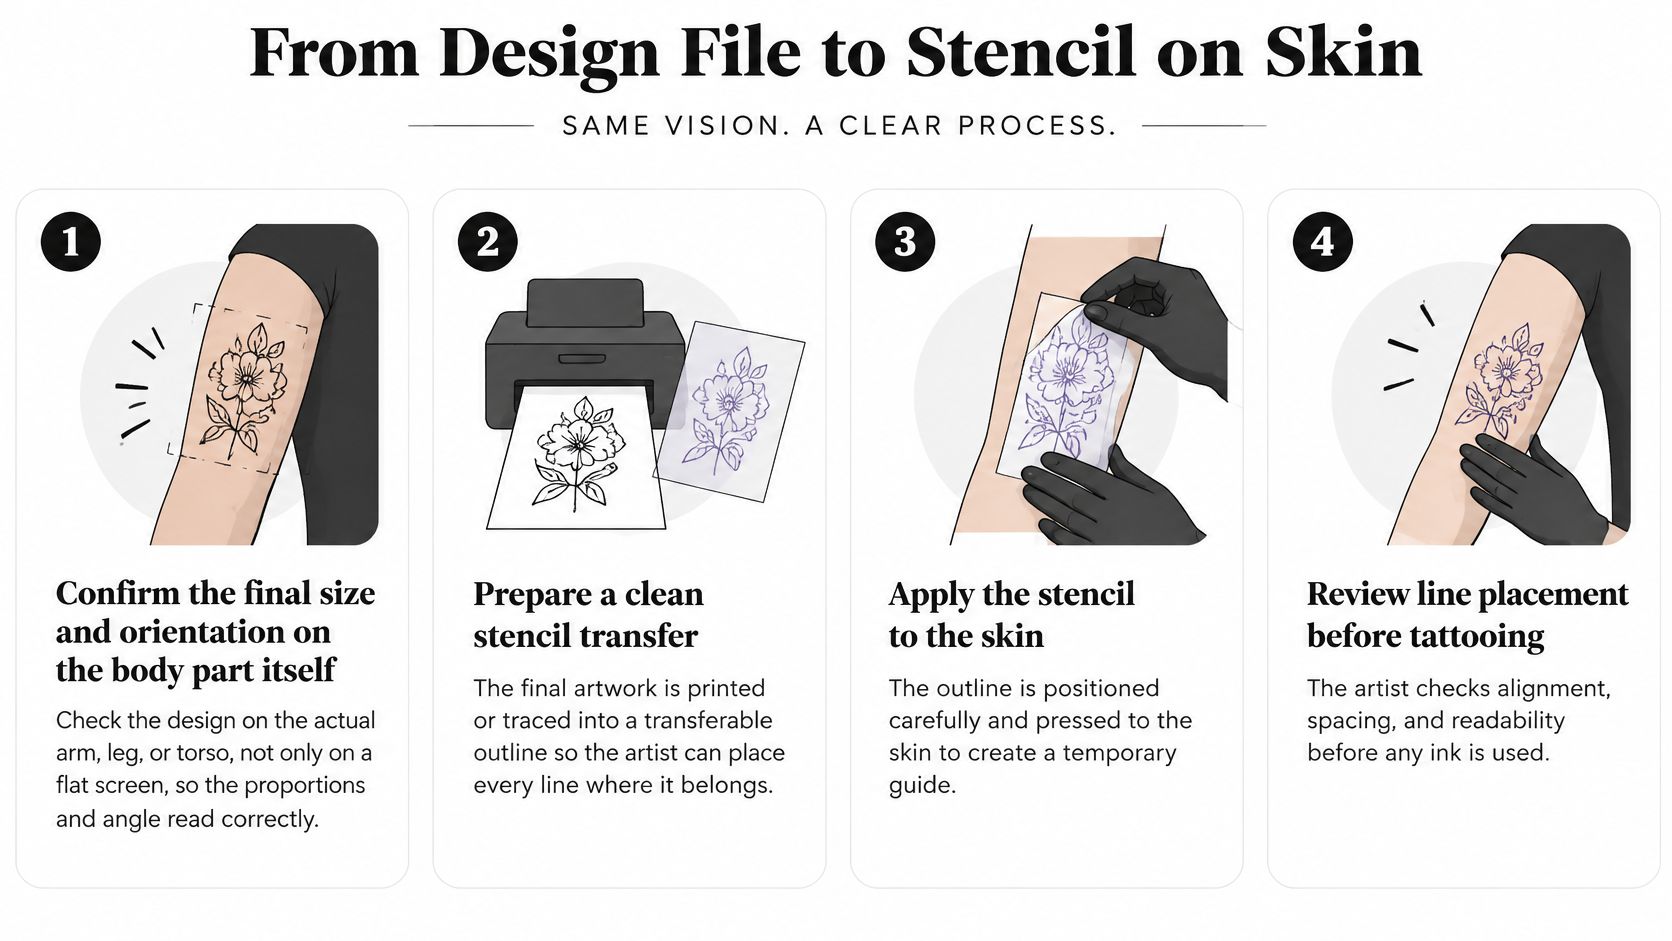
Confirm size and orientation on the body. Your artist checks the design against the actual arm, leg, or torso, not just a flat screen, because proportions that read well on a monitor can look wrong on a curved surface.
Check line weight and cut fine detail. Hairline strokes blur or break in transfer, so details too fine to survive get thickened, spaced out, or removed now.
Print at full size and inspect. The Queensland Health infection control guide recommends stencils be single-use, visibly clean, and free of dust, so smudges or missing lines mean a reprint.
Clean and dry the skin, then apply transfer solution. Clean soapy water can assist adhesion, reusable applicators shouldn't contact multiple clients, and fresh gloves and hand hygiene pair with every step.
Place the stencil in your natural posture. You hold the position you'll sit in during the session, because placement checked in a strained pose won't match how you carry the limb in everyday life.
Press, peel slowly, and check landmarks. Stretching skin during application shifts the apparent geometry after release, so your artist keeps tension neutral and verifies the outline against anatomical landmarks.
Photograph the placement. For multi-session work, the photo makes positioning repeatable next time.
If you want the wider picture of how a concept becomes finished artwork, our walkthrough of the tattoo design process from concept to skin covers the stages before this one.
Knowing When the Stencil Is Ready
A stencil is ready when the edges are crisp, there's no dust or smearing, your artist has signed off on it, and the outline still holds when you move. That last check is yours to ask for. Stand up, relax the limb, and look in the mirror before anyone picks up a machine.
Placement Decisions That Change the Final Stencil
A sleeve stencil can look flawless with your arm hanging straight, then distort the moment you bend your elbow. The paper doesn't bend the way your skin does. That gap between a flat design and a moving body is where most placement decisions get made.
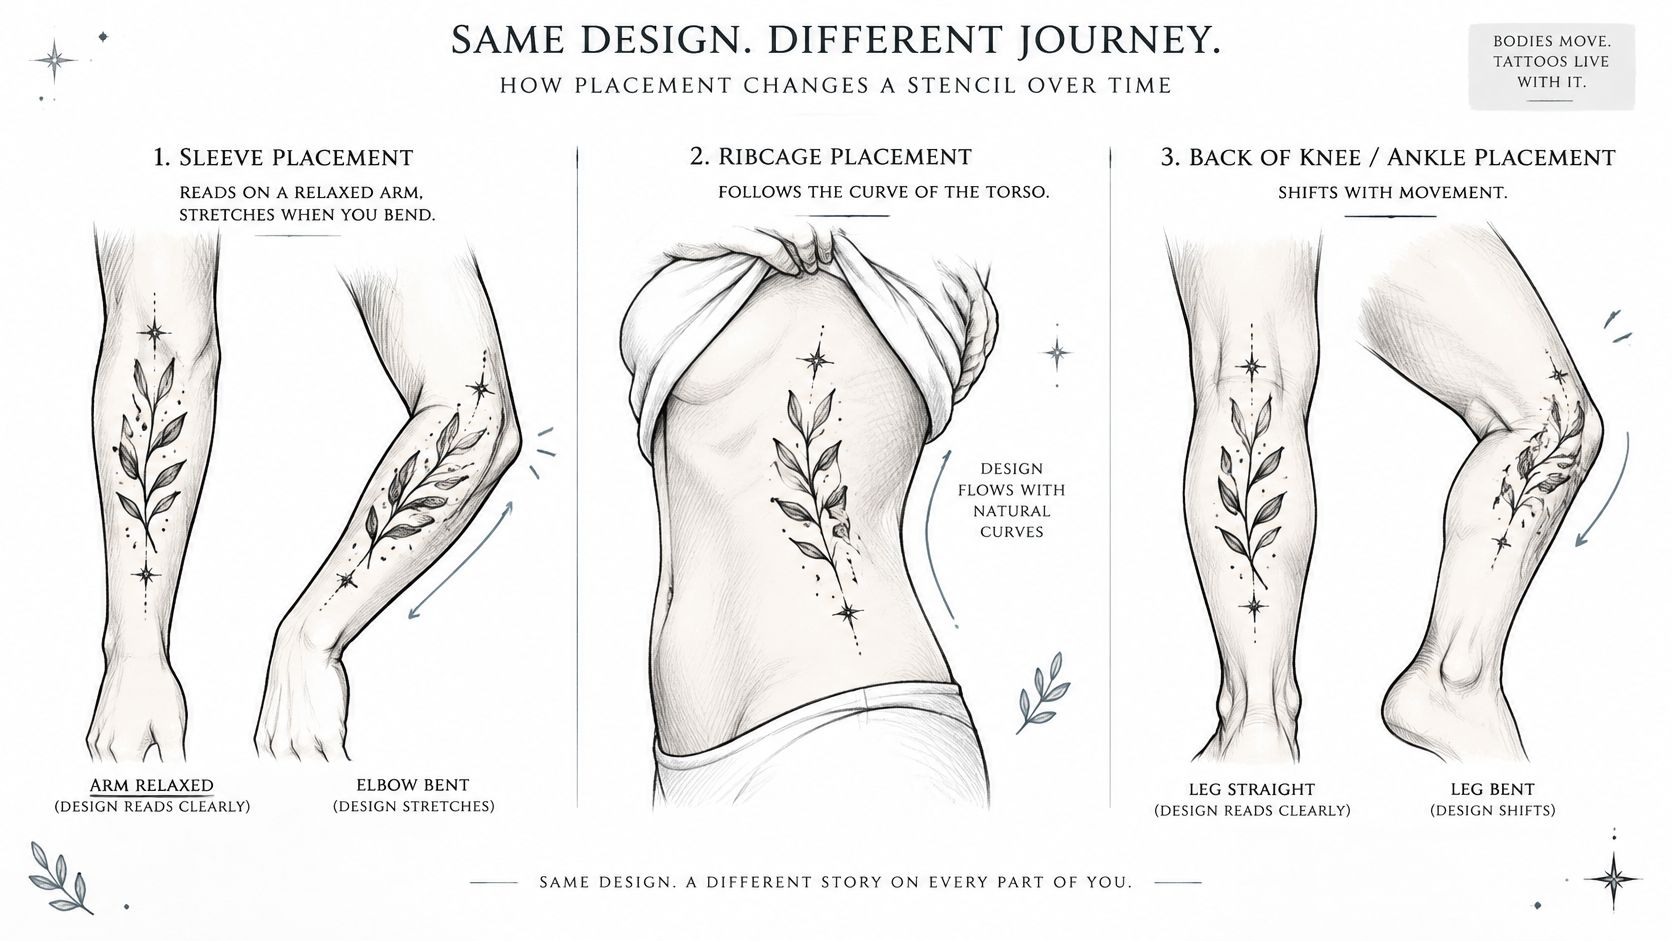
A ribcage piece shifts with every breath, so spacing that looks even while you hold still can bunch when you exhale. Fine lines on fingers and hands spread and fade faster than anywhere else, because the skin turns over quickly and takes constant friction. None of that means avoid those placements. It means the stencil has to be adapted to them, not copied onto them.
Factors That Force an Adjustment
Joints and mobile skin stretch and compress the design, so lines near elbows, knees, and wrists need room to move.
Curved anatomy wraps a flat image, which can squeeze the edges of a design placed on a shoulder or calf.
Darker skin tones may need bolder lines and more contrast so fine detail stays visible after healing.
Scars take ink unevenly and can pull a line off course.
Friction zones under straps, waistbands, and watch bands wear on healing skin and soften detail over time.
Your artist's adjustments follow from those factors. They may scale the design up, widen line spacing, rotate the image to follow a muscle, enlarge small details, or simplify the image rather than reproduce it exactly. Neighboring tattoos change the math too. Existing work sets the spacing, flow, and available skin for anything new, which is worth exploring in our guide to tattoo placement ideas before you settle on a spot.
This short video shows how placement testing works in practice before a design is committed.
Expectations about healing belong in this conversation too. A clinical review of tattoo reactions reports that acute reactions have been observed in roughly 70% of patients in one retrospective clinical sample, while persistent complications occurred in 6%. Stencil precision isn't the main quality signal. A slightly simplified design that fits your anatomy will outlast a perfectly traced one that doesn't.
Ask your artist to test the stencil while you move, not only while you sit still. Bend, twist, and relax. If the design only works in one pose, it doesn't work yet.
Preparing for a Stencil-Based Session
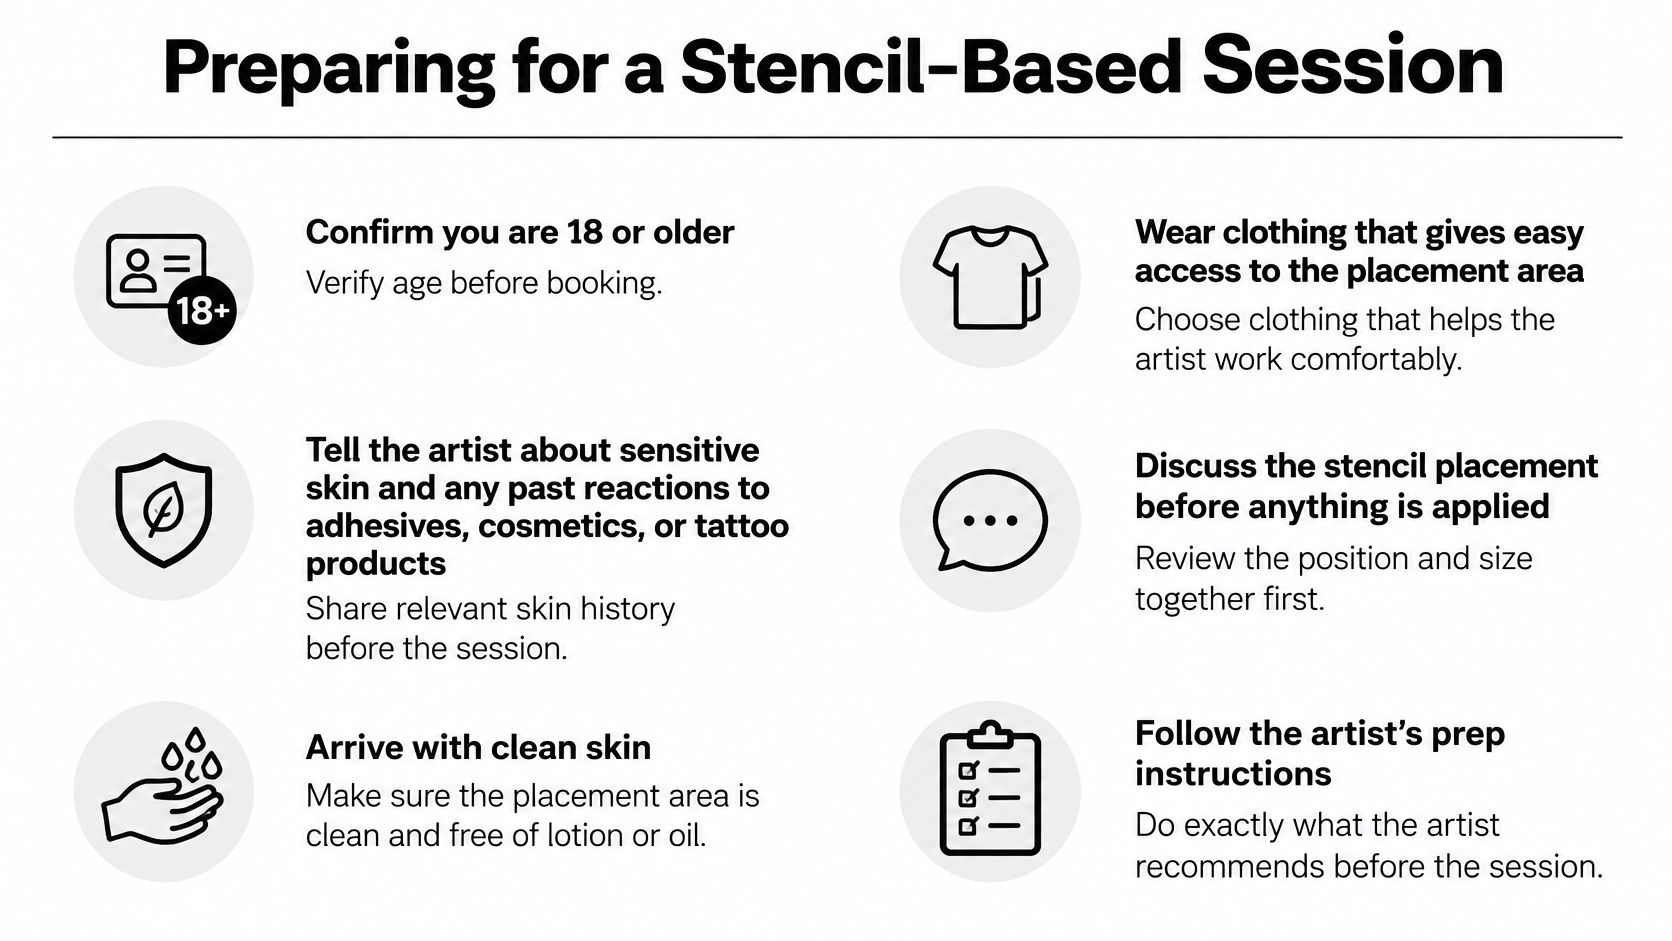
Work through this before your appointment.
Confirm you're 18 or older. We're 18+ only, and you'll need to meet that requirement before booking.
Disclose sensitive skin. Tell your artist about past reactions to adhesives, cosmetics, or tattoo products.
Ask for ingredient lists. Request the ingredients for both the transfer solution and the ink, especially if you have known sensitivities.
Share medical information. Disclose conditions and medications your artist asks about, and follow their advice on alcohol and blood-thinning medication before the session.
Eat and hydrate. Arrive fed and rested, with clean skin free of lotion or oil on the placement area.
Bring your references. Carry the design printed plus a reference photo, so sizing decisions don't depend on a phone screen.
Dress for access. Wear clothing that exposes the placement easily and won't rub the stencil once it's on.
Reserve stencil time. Build in time for a placement check before the needle starts, and don't let a tight schedule rush it.
Why Disclosure Matters
Reactions don't always show up at the session. A clinical overview of tattoo complications found symptom onset ranging from immediately after tattooing to as long as seven years, with a mean onset of 10 months. In a study of 301 patients with tattoo complications, allergic reactions involving red tattoo areas represented 50.2% of complications, while chronic inflammatory reactions involving black ink represented 18.2%.
That doesn't make red or black ink unsafe for everyone. It means color choice and your skin history deserve a real conversation, not just a sharp transfer. A patch test has limits, too. It can't rule out every reaction, particularly delayed ones, so treat it as one input rather than a guarantee.
Postpone the session if you have an active skin infection or open lesions at the placement site. Tattooing over compromised skin risks poor healing and spreads problems into fresh work. Rescheduling costs you a week. Tattooing anyway can cost you the piece.
Aftercare and Reactions to Watch For
Window | Usually expected | Contact a clinician if |
|---|---|---|
Days 1-3 | Redness, swelling, plasma oozing, tenderness | Redness spreads, fever develops, or pus appears |
Days 4-14 | Scabbing and itching as skin regenerates | Blisters persist, the area stays hot, or red streaks appear |
Weeks 2-8 | Peeling, dryness, fading shine as the surface settles | Raised, itchy patches or rash appear in the ink areas |
Months to years | Stable color with occasional touch-ups | New swelling, itching or a rash appears in the tattooed area |
Reading the Timeline
The first days bring redness, swelling, and some oozing, and that's normal. Your skin is responding to thousands of small punctures. Scabbing and itching through the second week mean the surface is regenerating, and peeling after that is the old surface letting go.
Your routine stays simple. Wash gently with fragrance-free soap, pat dry rather than rubbing, and apply a thin layer of the ointment your artist recommends. Don't pick scabs or peel flaking skin. Pulling at healing skin can pull pigment with it and leave pale gaps in lines that were placed correctly. Our detailed tattoo care advice covers product choices and day-by-day specifics.
Normal symptoms settle on a predictable timeline. Symptoms that spread, intensify, or return after settling are the ones that need attention.
When Normal Stops Being Normal
Spreading redness, fever, pus, persistent blistering, or raised itchy patches in the inked areas mean it's time for medical advice, not more ointment. Reactions can also appear well after healing finishes. New itching, swelling, or a rash in tattooed skin months or years later is still worth reporting to a clinician and your artist, even if the tattoo healed uneventfully the first time.
If a healed piece ever needs to come off rather than be reworked, it helps to compare tattoo removal session costs so you understand what that path involves before you're deciding under pressure. That's a last resort, not a plan, but knowing it exists makes the earlier decisions calmer ones.
Book a Stencil Consultation Before You Commit
A consultation is the low-risk next step, and ours is complimentary. Bring the design printed, a photo of the intended placement, and a written list of skin sensitivities, past reactions, and medical notes. Paper beats memory when you're answering questions in a busy shop.
Use the time to talk through design direction, placement, and timing. Ask how your artist will check the stencil against the way your skin moves, since a design that reads clean on a flat arm can distort the moment you bend or twist. Ask which transfer solution and ink they'll use and whether the ingredient lists can be shared. Ask how many sessions the piece needs and what the aftercare plan includes.
Then confirm the booking terms before paying anything. Our shop minimum is $100, a $100 non-refundable deposit reserves the appointment, and the studio is 18+ only. Appointments are booked by calling or emailing the shop, and you should not send a deposit until an artist or staff member directs you to do so.
The verdict in one sentence. A stencil suits bold, precise, repeatable designs, while freehand suits loose, adaptive ones, and knowing which yours is saves you from forcing the wrong process onto the right idea.
Bring your design in for a complimentary consultation at our Denver studio, where we'll talk through design direction, placement, and timing. Visit Think Tank Tattoo to call or email the shop and set yours up.
Comments